Eight frames from the only corpus in this repository with no colour in it at all — a measured mean chroma of 0.0000 across all 303 shots — and the only one graded from a PQ master, where the top of the scale is not white and every separation the film makes has to be built out of value, texture and edge.
Roma is the one film in this repository that cannot be discussed in the vocabulary the rest of it uses. Measured across all 303 shots, mean chroma is 0.0000. The largest per-frame mean chroma anywhere in the corpus is 1.5×10⁻⁵ and the largest 90th percentile 3.2×10⁻⁵ — arithmetic residue from putting three identical channels through a colour transform, not colour. The three RGB channels of every sampled frame are identical in shape. Every instrument in this project that depends on chroma therefore returns nothing: the vectorscope collapses to a single cell, the hue compass sums to zero, the warm/cool balance is null and the skin heuristic — which finds a face by its chroma — reports 0.0% skin on a film whose subject is a human face.
What is left is one axis, and this film uses more of it than any other studied here. Mean per-frame σL* is 23.50 across the photographed range, the widest of the forty-three corpora in this repository and clear of the next widest at 21.42. The film sits low — 45.6% of the average frame is shadow, 37.9% midtone, 16.5% highlight — and then reaches a long way up: this is a PQ master, CIELAB is anchored at the ITU-R BT.2408 diffuse-white level of 203 cd/m², and 157 of the 297 photographed frames put their 99th percentile above L* 100, with the highest at L* 182.6. The film's own average frame keeps 3.8% of itself above diffuse white.
It also never clips. Across the whole photographed range not one frame places even a tenth of a per cent of its pixels at the top code value in any channel, while 84 of 297 frames put more than one per cent at the bottom one. The look is built downward from a very high ceiling, not upward against a hard one. These eight studies take that architecture apart one problem at a time — a face against a sky that reaches L* 120 without breaking, a pale dress in front of a pale wall, five whites and a skin tone separated in a lift, an auditorium and its screen ninety-eight L* apart, an inserted image this camera did not photograph, fire seen through its own smoke, a dirty windscreen carrying the brightest measurement in the corpus, and a sea in which nothing but texture separates anything from anything.
Subject
Roma
Studies
8 frames
Measured against
297 photographed midpoint frames
Interpretation
PQ (SMPTE ST 2084), CIELAB anchored at 203 cd/m²
The film-level construction
What holds the look together
The chroma is not low. It is zero.
Across all 303 shots the mean C*ab is 0.0000; the largest per-frame value in the corpus is 1.5×10⁻⁵, which is what a colour transform leaves behind when it is given three identical channels. Measured |R−G| and |G−B| are 0.000 on every frame sampled: the channels are the same signal. The next least chromatic corpus in this repository is First Cow at C* 3.55, which is a low-chroma colour film; this is not a low-chroma colour film.
Every chroma-derived measurement in the pipeline therefore reports a true zero: high-chroma fraction 0.0, saturation mean 0.0, warm/cool balance null, skin fraction 0.0 on all 303 shots. That last one matters for anyone reusing this data — the skin detector finds faces by chroma, so on this film it finds none, and its silence is not evidence about faces.
The widest tonal spread of forty-three corpora
Mean per-frame σL* is 23.50 over the photographed range and 23.22 over all 303 shots. Both figures are the highest in this repository, above The Toxic Avenger at 21.42, Hero at 21.21 and The Conformist at 19.21. The mean 10th-to-90th-percentile spread of a single frame is 58.0 L*.
That is what a monochrome film does when the HDR range is available and hue is not: the separations a colour film distributes across two axes all have to be made on one, so the one gets used harder.
The ceiling is not white
This is a PQ master read as absolute luminance and anchored at the BT.2408 diffuse-white level of 203 cd/m². 157 of the 297 photographed frames — 52.9% — carry a 99th percentile above L* 100, and the highest reaches L* 182.6. On the average frame, 3.8% of the picture sits above diffuse white.
So 'white' in this film is a level inside the range, not the end of it, and the material above that level is specular: glass, water, flame, filament and sky edges. No SDR corpus here can produce that reading, which is why this film's numbers are not directly comparable at the top of the scale even though they are at the middle.
It reaches the floor and never reaches the ceiling
Not one frame in the photographed range puts as much as a tenth of a per cent of its pixels at the maximum code value in any channel. The corpus maximum for channel clipping is 0.000. At the other end, 84 of 297 frames put more than one per cent of their pixels at code zero, and one frame reaches 46.6%.
The look is therefore built downward from a very high ceiling rather than upward against a hard one, and the only hard limit the film accepts is black. Grading toward this needs the shoulder left alone and the toe placed deliberately, which is the opposite of most first passes.
The still is a weaker witness here than anywhere else
303 clips across 133.8 minutes of picture gives a median shot of 13.72 seconds and a mean of 27.02. Twenty-nine shots run over a minute, eight over two, and the longest runs 391 seconds. This is the slowest cut in the repository, and the detection is right: the cuts that exist are real, there are simply very few of them.
A midpoint frame consequently stands for a much longer stretch of screen time than in any other study here, and stands for more camera movement inside it. Nothing in these studies should be treated as describing a whole shot, and every window, qualifier and tracked correction proposed below has to survive a move that a still cannot show.
Separation is spatial, and it is deliberate
With hue unavailable, the film separates by placing values in space. The mean centre-to-edge lightness delta across the photographed range is 8.95 L*, and individual compositions run far past it — 51.6 L* in the cinema, 49.0 L* through a windscreen — while the flattest fields drop to about one.
The recurring device is a dark surround holding a bright event: a lit gateway at the end of a dark passage, headlamps down a black corridor, a screen above an unlit auditorium. Reconstructing this film is largely a matter of building those surrounds without letting them read as vignettes.
Resolve blueprint
A node tree built to be adjusted, not copied blindly
Normalize camera originals into DaVinci Wide Gamut / DaVinci Intermediate through Resolve Colour Management or a documented input CST before anything below. The input transform is not part of this look, and moving the supplied 10-bit PQ reference into a wide-gamut working space does not give back camera primaries, highlight latitude or the colour information that the finish removed.
The graph departs from this project's standard shape in two places, and both departures are the film. Where a colour reconstruction has a palette-compression node, this one has a monochrome conversion node — the point at which hue stops being colour and becomes density, and the single most consequential decision in the tree. Where a colour reconstruction has luminance-dependent saturation, this one has a diffuse-white and specular-headroom node, because on a PQ master the question that replaces 'how saturated at what level' is 'what counts as white, and what is allowed above it'. Suggested values are starting ranges for correctly normalized log or raw footage, not recovered settings.
Group Pre-ClipR01
Input transform
Normalize camera originals so that none of this film's unusual placement is read as a property of the encode.
Do this
Decode raw from camera metadata, or transform a documented log/gamut into DaVinci Wide Gamut / DaVinci Intermediate.
Give every plate, insert, archival element and title element its own correct input transform before it meets this graph.
If project colour management already performs the IDT, omit this node rather than doubling it.
Starting points
Keep creative tone mapping out of the input stage; display mapping belongs to R12.
For the supplied PQ reference only, decode ST 2084 to absolute luminance and anchor lightness at 203 cd/m² — as an explicit comparison assumption, not as a grading source.
Watch
On a PQ file the black of a night interior sits near code 0.03–0.10, not near zero; a pipeline that treats the signal as gamma-encoded video will read the whole film wrong and read it wrong differently at each end.
Confirm data/video levels before treating a floor this low as intentional.
Group Pre-ClipR02
Exposure and scene neutral
Place the key and remove colour casts while the image is still in colour, because a cast that survives to the conversion becomes a density error that cannot be undone.
Do this
Set Offset so the scene's principal surface lands where the film puts it: overcast exterior around L* 60–70, interior daylight around L* 35–45, night interior below L* 10.
Neutralize the source in colour. A tungsten interior left uncorrected will convert to a different density than the same interior corrected, and neither is recoverable afterwards.
Match adjacent shots on level before doing anything else; this film cuts between extremes and any drift is visible across a long take.
Starting points
Corpus mean key is L* 32.26 with a per-frame σ of 23.50; a shot that lands at the mean is unusual rather than typical.
Only 15 of 297 photographed frames sit within 2 L* of the corpus mean — treat 'average' as a statistic, not a target.
Watch
Exposure decisions taken by eye on an SDR display will systematically underplace a film whose diffuse white is 203 cd/m².
A long take can change key inside itself; balance on a representative moment, not on the frame you happened to park on.
Clip · the decisive nodeR03
Monochrome conversion and channel weighting
Turn hue into density on purpose. This node does the work a palette-compression node does in a colour grade, and it is where the film's separations are actually made or lost.
Do this
Do the conversion with a controllable weighting — a hue-vs-saturation curve pulled to zero after a channel mixer, or a Color Warper set to collapse chroma — not with a saturation slider at zero.
Decide each relationship explicitly: skin against a plaster wall, foliage against sky, a red tail-light against a black car, blue denim against grey concrete. Each is a density choice, and the default mix decides them all badly at once.
Set the weighting per scene where the production colours change, and hold it across a cut where they do not.
Starting points
A green-weighted mix renders skin lighter and foliage lighter; a red-weighted mix darkens skies and separates skin from stone. Start from a broadly panchromatic mix and move one channel at a time.
Judge the result on the two surfaces that must not merge, not on the whole frame.
Watch
This node is invisible on a chroma scope by definition: after it, every instrument that measures colour reports zero and can no longer tell you whether the decision was good.
Two surfaces that separate cleanly at one weighting can merge exactly at another; check the merges, not the contrasts.
Anything downstream that qualifies by hue will stop working; qualify by luminance and by shape from here on.
ClipR04
Toe architecture and black placement
Decide where the picture stops, on a film that regularly goes all the way to the floor and keeps structure just above it.
Do this
Place the toe with a soft custom curve rather than a lift, so the material between the floor and the first readable detail stays continuous.
Decide per scene whether black is a surface or an absence. Roma does both, sometimes in the same frame.
Where a frame reaches code zero, confirm that what is lost is genuinely empty and not the shadow detail of a lit subject.
Starting points
84 of 297 photographed frames put more than 1% of their pixels at code zero; the corpus maximum is 46.6%. Reaching the floor is normal here, and crushing to it is not the same thing.
The mean 10th-to-90th-percentile spread inside the shadow zone is 14.4 L*; shadows in this film are a range, not a level.
Watch
Toe changes made on an uncalibrated display will not be visible at all; check on a waveform at full scale.
A toe that works on a still can pump across a long take as the camera pans off a light source.
Watch for banding in large near-black fields on delivery, where the encode has the least to work with.
ClipR05
Diffuse white and specular headroom
Decide what counts as white and what is allowed above it — the question that replaces luminance-dependent saturation on a monochrome HDR grade.
Do this
Place the scene's diffuse white — plaster, paper, a coat, an overcast sky — deliberately, and only then decide how far specular material is allowed to run past it.
Shape the shoulder so that highlight material rolls rather than stops, and verify that nothing lands on the top code value.
Keep the SDR trim in mind from here: material above diffuse white is exactly what an SDR pass has to negotiate.
Starting points
Diffuse white sits at L* 100 by construction here (203 cd/m²). 52.9% of photographed frames carry a P99 above it; the corpus maximum is L* 182.6.
The average frame keeps 3.8% of itself above diffuse white. A frame with much more than that is making a point; a frame with none is a choice too.
Watch
Channel clipping is zero everywhere in this film; if your reconstruction clips, the shoulder is wrong, not the source.
Specular material that survives HDR can collapse into a flat patch in SDR; check both before approving the shoulder.
A shoulder tuned on a sky will usually be wrong on a filament or a water specular; test on all three.
Clip · parallelR06
Faces and skin density
Hold faces at a readable density when nothing about them is chromatically distinct any more.
Do this
Qualify faces by luminance and shape — a soft luma key inside a tracked window — because the hue qualifier that would normally do this has nothing to work with.
Set face density relative to the surface immediately behind the head, not to an absolute value.
Where the same face crosses a bright and a dark background inside one take, split the correction and track it rather than compromising between the two.
Starting points
Faces in this film sit anywhere from a few L* above the floor to above diffuse white; there is no house skin level to aim at.
Aim for about 8–15 L* of separation between a face and the surface directly behind it before adding any local shaping.
Watch
The project's skin detector reports 0.0% skin on every shot of this film because it works from chroma; do not read that as a measurement about faces.
A luma-keyed face matte will grab a pale wall the moment the actor steps in front of one — check the whole take.
Dark hair against a dark ground is where this film's faces are most fragile; inspect that edge at full resolution.
Clip · parallelR07
Costume, wall and material density
Keep two surfaces of similar value apart when they meet, which on this film is the routine problem rather than the exceptional one.
Do this
Identify the pair that must not merge — dress against plaster, coat against tile, white against white — and give one of them a small independent density move.
Prefer a few L* of level difference plus a contrast move on the texture over a large density shift, which reads as a graded object.
Use the production's own two-tone paintwork, tiling and trim as the separation where it exists, rather than inventing separation the set did not supply.
Starting points
Frames in this film routinely resolve into four or five near-equal tonal clusters; an even staircase is the film's normal state, not a fault.
3–8 L* between two adjacent surfaces is usually enough when the texture differs; less than that needs the texture doing the work.
Watch
Separation that reads at presentation size can disappear on a phone and on an SDR trim; check both.
A qualifier built on a pale garment will find the wall behind it; feather on the shape, not on the level.
Watch the edges of any window across a long take — this is the node whose errors move most visibly.
Clip · parallelR08
Sky, water and open-field density
Give the film's large featureless areas — sky, sea, plaster, smoke — a density and a gradient without letting them become paper.
Do this
Treat a blank sky as a surface with a value and a gentle gradient, not as the top of the range.
Where sky and a subject meet with no chromatic difference, put the separation into the subject rather than the sky.
For water and grass fields, protect micro-contrast before touching level; these areas are all texture and no colour.
Starting points
The film's blank skies sit around L* 110–120 and hold a gradient across the frame; they do not run to the top of the scale.
Its widest sea and grass fields keep a 10th-to-90th spread near 68 L*, so there is more structure in them than they appear to have.
Watch
A sky flattened to a single value will band on delivery long before it looks wrong on the reference monitor.
A gradient added to a sky will slide against a moving horizon; track it or leave it.
Boosting micro-contrast in water immediately raises the noise floor of everything else in the frame.
Clip · tracked windowsR09
Local light shaping
Build the dark surrounds that hold this film's bright events, without producing anything that reads as a vignette.
Do this
Shape to the architecture — a doorway, an arch, a corridor, a row of seats — rather than to an oval.
Take density out of the surround before adding any to the subject.
Track every window across the whole take and check it at the extremes of the move, not at the midpoint.
Starting points
The corpus mean centre-to-edge delta is 8.95 L*; the film's strongest compositions run past 50 L*, and its flattest sit near 1 L*.
Where the frame already has a 40 L*+ split, the grade's job is usually to protect it rather than to increase it.
Watch
In a monochrome image a soft-edged window is far more visible than in a colour one, because there is no hue variation to hide the gradient in.
A window that sits still while the camera moves will be seen; a window that tracks a subject through a doorway will be seen at the doorway.
Check every shaped area against the frame edge, where a soft falloff turns into a visible corner.
Clip · optionalR10
Atmosphere: smoke, haze and veiling glare
Control the film's atmospheric passages, where the source, the diffuser and the subject are all the same grey.
Do this
Use a soft luminance-keyed lift restricted by a depth-shaped window to place the atmosphere, rather than a global lift.
Decide how much of the veil to keep before deciding how much contrast to add; the two fight each other.
Where glare comes from the optics — a dirty windscreen, a flare across a lens — treat it as photographed content and shape it, do not attempt to remove it.
Starting points
The film's smoke passages compress toward the middle: over 60% of one such frame sits in the midtone zone against a corpus mean of 37.9%.
Start the node bypassed and enable it only where the picture is genuinely atmospheric.
Watch
Adding contrast into smoke reveals its movement and can make a soft element strobe across a long take.
A depth window in an atmospheric shot will be visible at the moment the atmosphere thins.
Veiling glare is the first thing an SDR trim exaggerates; check the trim before approving the level.
Clip · optional, start bypassedR11
Texture, grain and inserted material
Manage the film's texture floor, and give material that did not come from this camera its own treatment.
Do this
Leave the base texture alone unless a specific shot needs it; the film's own grain is fine and even.
Where an archival or screen element is cut in, grade it as a separate element with its own transform, black point and grain, and do not force it to match the surrounding photography.
If noise reduction is used at all, use it below the toe and check what it does to skin at full resolution.
Starting points
Inserted archival material in this film sits entirely below diffuse white and inside a narrow band at the bottom of the range; matching it to the host grade would falsify it.
Keep any added grain out of the top of the range on an HDR deliverable, where it becomes conspicuous.
Watch
Noise reduction applied globally will flatten water, smoke and grass, which are the only places this film has detail to lose.
Grain added before the output transform behaves differently in HDR and SDR; add it after, and check both.
Inspect any inserted element's matte edges at full resolution before deciding they are a defect.
Group Post-Clip / TimelineR12
Output transform and display trims
Deliver a film that lives above SDR white for more than half its running time, to displays that cannot show that.
Do this
Set the output transform once at group or timeline level and never duplicate the input transform inside it.
Build the SDR trim as its own pass, with its own decisions about what happens to specular material.
Re-check black placement after the trim; a toe that reads correctly in HDR frequently closes up in SDR.
Starting points
52.9% of the film's photographed frames contain material above 203 cd/m²; the SDR trim is a substantial creative pass, not a formality.
Trim on the extremes first — the blank sky, the archival insert, the windscreen — then check the ordinary interiors.
Watch
An SDR trim that protects speculars will usually cost shadow separation somewhere; decide which shots pay.
Any grain or texture added upstream will look different either side of the trim.
Confirm on the final deliverable that nothing has been pushed onto the top code value by the trim itself.
8 reconstruction studies
Read the image first; use the scopes to test the read
Each study begins with what is visible and then tests that reading against measurements of the active picture. Every metric describes the whole midpoint frame: it cannot find a face, a coat or a flame without the visual inspection recorded in the prose, and the tonal clusters name populations of density, not objects.
The scope row carries a waveform and two tonal distributions instead of a waveform, a parade and a vectorscope. That is a deliberate divergence from the Roma slide lab, which keeps its empty chroma panels on the principle that an instrument reading zero is reporting a true result and that the labs are only comparable if the instrument does not change between them. Both positions are defensible; a reconstruction report is read by someone about to build a node tree, and three panels of which two are structurally blank would be three panels of which two are useless to them.
Build the base with every optional node bypassed. Add only the operations named in the shot recipe, inspect mattes at full resolution, and review moving footage before approving any qualifier, tracked window or texture node.
01 · Value architecture · the top of the scale · shot 206 · 02:23:20:11
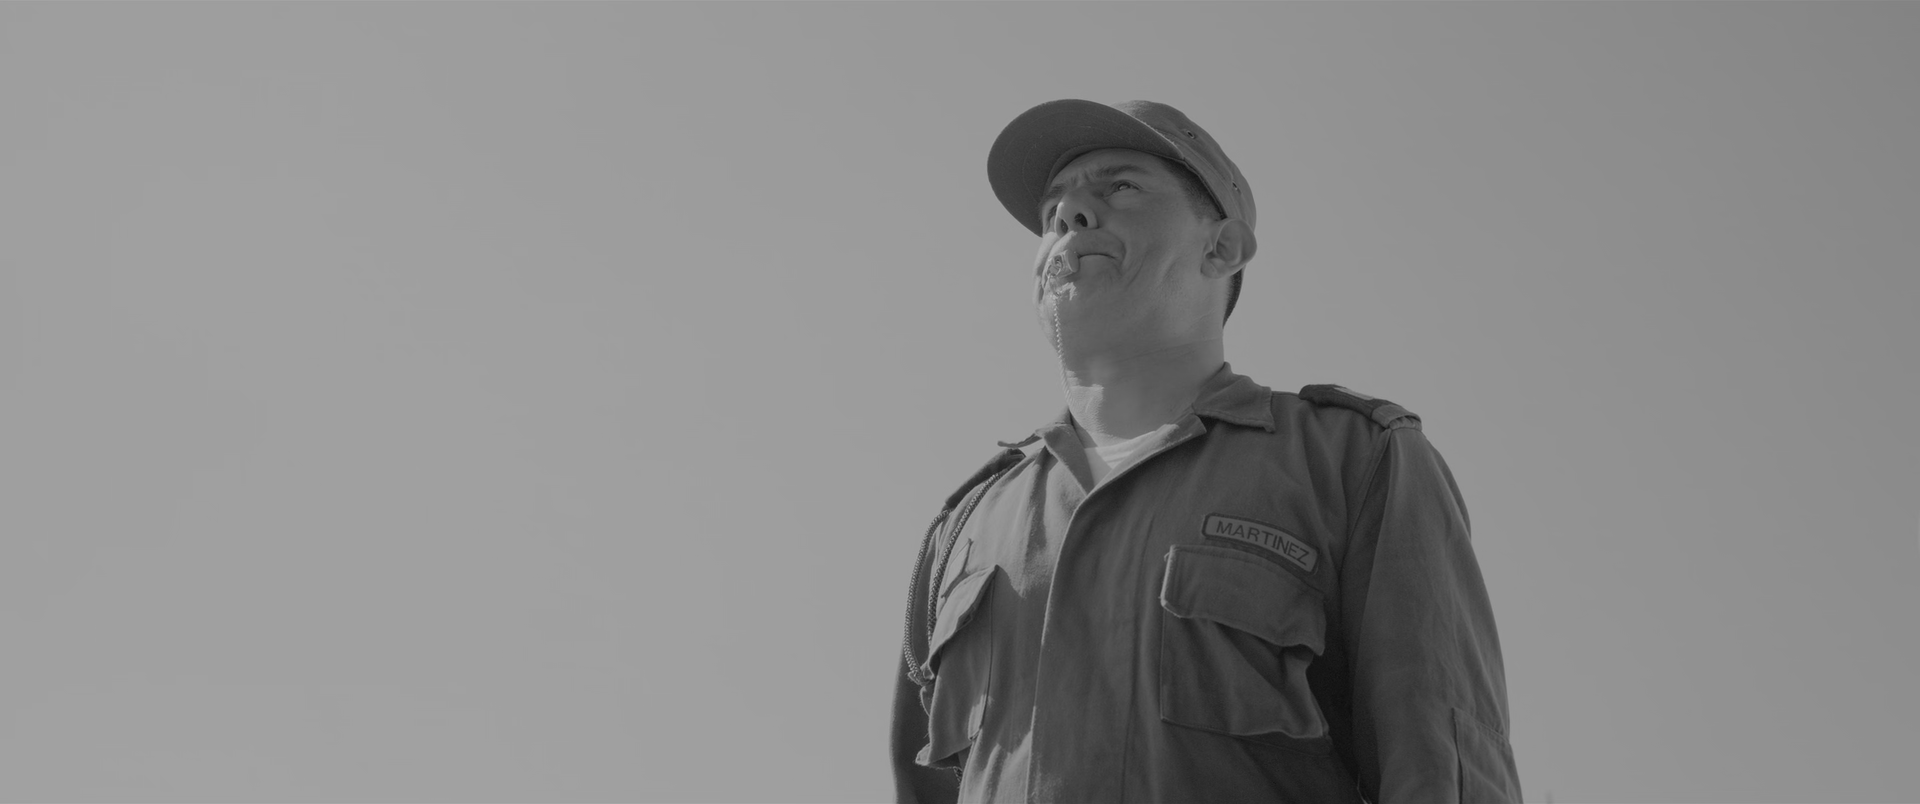
A face against a sky that stops twenty L* above white
A man in a peaked cap and a field jacket looks upward, right of centre, against a completely featureless pale sky that fills the rest of the frame.
Half the frame sits above diffuse white and not one pixel of it reaches the top of the range: the sky is a plateau at L* 116, not a clipped area.
What is remarkable
This is the brightest image in the study at mean L* 92.46, and its interest is entirely in what it does not do. 54.83% of the frame lies above diffuse white — fourteen times the film's own average of 3.8% — and channel clipping is 0.000%. The largest tonal cluster holds fully 50% of the picture at L* 115.7, with a second at L* 96.7 taking another 22.2%. The 99th percentile is L* 120.1 and the 90th is L* 118.5: two L* apart. The sky is not a blown wedge running away to the top of the scale, it is a flat plateau sitting about sixteen L* above white and a very long way below the ceiling the ST 2084 range would allow.
Against that, the figure is carried by 8.34% of the frame at a mean of L* 12.0, with only 1.31% in deep shadow. The whole tonal argument of the image is one enormous even area and one small dark one, and the separation between them is somewhere between thirty and ninety L*. What is delicate is not the figure-to-sky relationship but the relationship inside the figure: the peak of the cap shadows the eyes, the jacket's pocket flaps and the name tape register as small differences only, and the lit side of the face against the cap's underside is the only fine tonal work in the picture.
Centre-to-edge measures −13.48 L*, the centre being darker than the edge. That is consistent with the figure occupying the middle of the frame while the sky occupies the border, and it is a description of where the subject is standing, not evidence of a vignette.
Where the image comes from
The sky, the light on the face and the costume are photographic. Flat overhead haze with no visible sun, a jacket and a cap chosen to sit dark against it, and a low camera angle that puts nothing but sky behind the head — all of that is production and none of it can be manufactured downstream.
What the grade owns is the plateau: the decision that the sky settles at a value about sixteen L* above white and stays there, and the shoulder that gets it to that value without ever touching the top code. Work in this order — place the face first, then place the sky, then check that the sky's own gradient survives — because the face is the only thing in the frame with any structure to lose.
Waveform · signal
Tone distribution
Cumulative tone
Can regular footage get there?
High
Any correctly exposed log or raw capture under flat haze reaches this. The work is in restraint at both ends of the chain: not letting the sky run to the top of the range in the grade, and not letting the deliverable put it there afterwards.
Minimum capture conditions
Even overcast or hazy sky with no visible sun disc and no cloud structure to defend.
A costume and a camera angle that put a genuinely darker mass against that sky; a light jacket would leave nothing to separate.
A capture and a delivery chain with enough headroom to hold a large even area sixteen L* above white without banding it or clipping it.
Composite and background read
Nothing in the frame invites a composite reading
The light on the face — soft, from above and slightly to the frame left — is consistent with the open sky behind him, and at full resolution the silhouette edge shows the ordinary softness of a long lens against a bright field rather than a matte line.
A featureless sky is precisely the area in which replacement work would leave no evidence, so 'none' here means the frame offers no cue, not that no work was done.
Shot-specific Resolve pass
Use the global tree, then make these decisions
R02
Place the face, not the sky
Set Offset so the lit side of the face lands near L* 45–55 and the cap shadow stays above L* 8.
Why: The face is the only area in the frame with structure that can be lost; the sky can be placed afterwards without damage.
Watch: Balancing on the sky will drag the face down and flatten the cap shadow into the jacket.
R05
Build the sky as a plateau
Shape the shoulder so the sky settles into a narrow band around fifteen to twenty L* above diffuse white, with the 90th and 99th percentiles within a few L* of each other.
Why: The film's brightest image reaches L* 120 and stops; a shoulder that keeps rising here turns a surface into a hole.
Watch: Check the top code value on a full-scale waveform, not by eye.
R08
Keep the sky's gradient
Leave the small lateral falloff across the sky in place, and confirm on a scope that it is still continuous after the shoulder.
Why: The gradient is the only thing preventing a fifty-per-cent area of the frame from reading as paper.
Watch: This is the frame in the study most likely to band on delivery.
R06
Hold the face against the field
If the face needs local work, use a tracked window with a very soft edge and a small density move only.
Why: Against an even field there is nothing to hide a correction in.
Watch: Any halo around the head will be visible immediately; check the shoulders and the cap peak, where the edge is longest.
R12
Decide what the sky becomes in SDR
Trim so the sky lands just below SDR white with the face unchanged, rather than letting the transform take the sky to white and the face with it.
Why: Over half of this frame is above SDR white; the trim is a creative decision here, not a conversion.
Watch: Re-check the cap shadow after the trim — it closes first.
Failure modes to check before approval
Inspect the sky for banding at full resolution and on the final deliverable; a large even area sixteen L* above white is the worst case in the whole film for the encode.
The shot runs 3.75 seconds and the head moves; confirm that any face window or luma key holds through the movement rather than only at the midpoint.
On moving footage check that the sky does not shift value as the camera reframes — a plateau that drifts will read as a grade breathing.
02 · The default register · pale on pale in flat daylight · shot 8 · 01:07:05:23
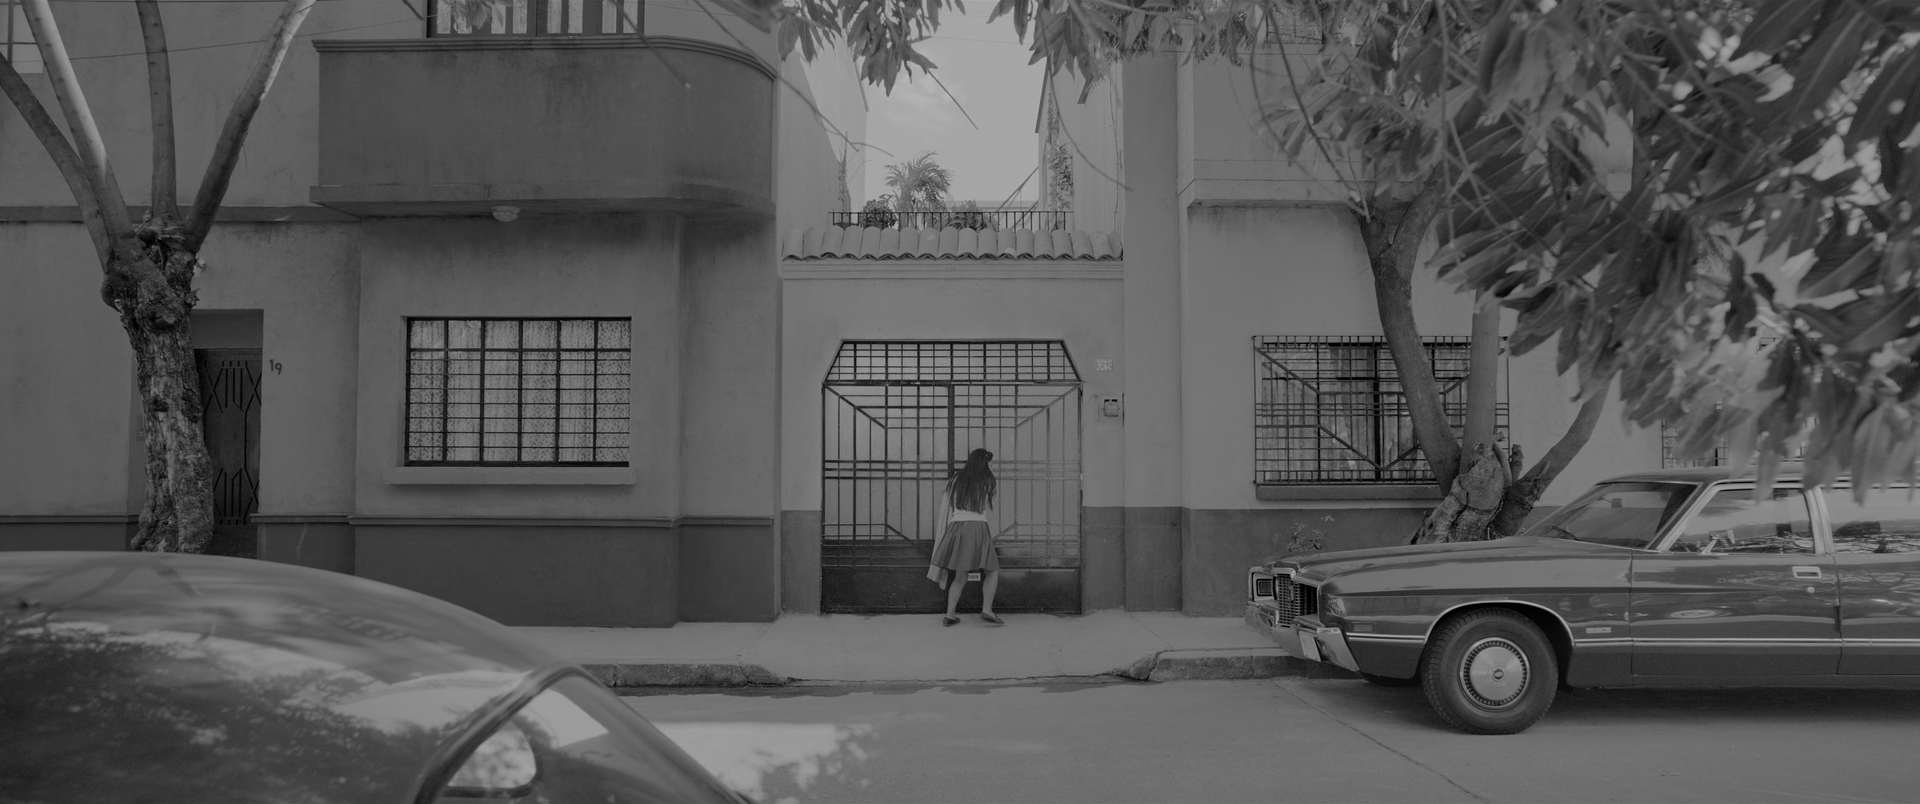
A four-step grey scale with a girl standing in it
A residential street in flat, almost shadowless daylight: a stucco facade with barred windows and a tall barred gate, a small girl in pale clothes at the gate, a large saloon parked at the right.
Four tonal clusters at L* 10, 25, 41 and 60 hold 21.6%, 24.1%, 24.8% and 25.9% of the frame: this image is very nearly a step wedge with a figure standing in it.
What is remarkable
At mean L* 37.78 against a corpus mean of 32.26 this is the film's default register, and its structure is unusually explicit. The four principal tonal clusters land at L* 9.9, 24.6, 40.6 and 59.7 — almost exactly evenly spaced — and hold 21.6%, 24.1%, 24.8% and 25.9% of the picture, almost exactly equal shares. A fifth cluster at L* 113.5 takes the remaining 3.6%: the patch of open sky visible above the gate, and the only material in the frame above diffuse white, which totals 2.64%.
66.01% of the frame is midtone, against a corpus mean of 37.93%, so almost everything here is in the middle of the scale together. The separations are consequently small and structural rather than tonal: the darker painted band along the base of the wall, the recess behind the barred gate, the shadowed undersides of the balcony and the window reveals, the dark tree trunks. Twenty-eight distinct lit regions are detected with the largest holding 62.53% of the frame, which is what flat frontal light on a broken facade produces — one big lit field, punched through with small dark ones.
The girl is dressed in the same value as the wall she stands against, and the composition solves that rather than the grade: she is placed in front of the gate, which is the darkest vertical in the facade, and her hair supplies the only strong dark against her own top. The centre of the frame measures 6.36 L* above the edge, close to the corpus mean of 8.95, which for a frontally lit facade means the light really is that even.
Where the image comes from
Everything that makes this frame legible was decided before the camera rolled: the two-tone paintwork on the wall, the gate's recess, the pale dress against the darker gate rather than against the plaster beside it, the trees breaking the top of the frame, and the flat open-shade light that produces no shadow to cut anything out with.
The grade's job here is not to add separation but to avoid destroying the separation the production supplied. That means resisting the two obvious moves — raising overall contrast, which will merge the wall's four steps into two, and lifting the gate recess, which is the only thing holding the figure. Set the key, decide the conversion weighting on the dress-against-plaster relationship, then leave the middle of the scale alone.
Waveform · signal
Tone distribution
Cumulative tone
Can regular footage get there?
High
An ordinary overcast or open-shade exterior on log or raw material reaches this without difficulty. The demanding part is not capture; it is the discipline to leave a frame that is two-thirds midtone as a frame that is two-thirds midtone.
Minimum capture conditions
Flat overcast or open-shade daylight with no direct sun anywhere in frame.
A location or set whose own paintwork, recesses and trim supply the tonal divisions — this frame cannot be built out of an evenly painted wall.
Costume chosen for value against that wall, and a camera position that places the figure against the darkest element available.
Composite and background read
A period street offers the usual invisible-cleanup possibilities and no visible cue
The frame is a period-dressed residential street with period vehicles and one patch of open sky above the gate — the kind of shot in which removals are routine. Against that, every element in the picture integrates: the vehicles sit correctly on the road surface, the tree branches occlude the balcony consistently, and the light on the facade and on the cars is the same light.
A still cannot show what was removed, and clean-plate removals leave nothing behind; practical dressing of a real street remains at least as plausible as any digital explanation here.
Shot-specific Resolve pass
Use the global tree, then make these decisions
R02
Set the exterior key
Place the plaster wall's lit face near L* 60 and the pavement near L* 40, and neutralize the source before anything else.
Why: This frame is the film's default register; where it lands sets where its neighbours land.
Watch: A cast left in the source will convert to a wall that is the wrong density relative to the dress.
R03
Decide the dress against the plaster
Set the channel weighting on the single relationship of the pale garment to the plaster behind it, then check what that weighting has done to the foliage and the sky patch.
Why: That pair is where this frame succeeds or fails, and the conversion decides it before any grading node can.
Watch: A weighting that separates the dress may collapse the tree foliage into the wall behind it.
R07
Protect the wall's own steps
Keep the darker painted band, the plaster above it and the pavement as three distinct levels; if they need help, move one by a few L* rather than raising global contrast.
Why: Two-thirds of the frame is midtone, so a contrast move here merges surfaces rather than separating them.
Watch: Check the band's edge along the whole facade, not only where the girl stands.
R04
Leave the gate recess dark
Hold the recess behind the bars at the bottom of the range with detail intact, and resist lifting it.
Why: It is the only dark vertical in the facade and it is what holds the figure.
Watch: Deep shadow here is under 4% of the frame; a lift that looks small on a scope is large in the picture.
R05
Keep the sky patch a patch
Hold the visible sky above the gate near its measured level rather than letting the shoulder take it further.
Why: It is 3.6% of the frame and the only material above diffuse white; pushed further it becomes the subject.
Watch: This is the smallest above-white area in the study and the easiest to clip by accident.
Failure modes to check before approval
Check the dress-to-plaster separation at phone size and on an SDR trim; it is a few L* and it is the first thing either will lose.
Any luminance qualifier built on the dress will find the plaster the moment the girl moves along the facade; the shot runs 17.7 seconds.
On moving footage confirm that the four-step structure of the wall holds as the light changes across the take, rather than only at the midpoint frame.
03 · Separation without colour · five whites and a skin tone · shot 252 · 02:39:51:08
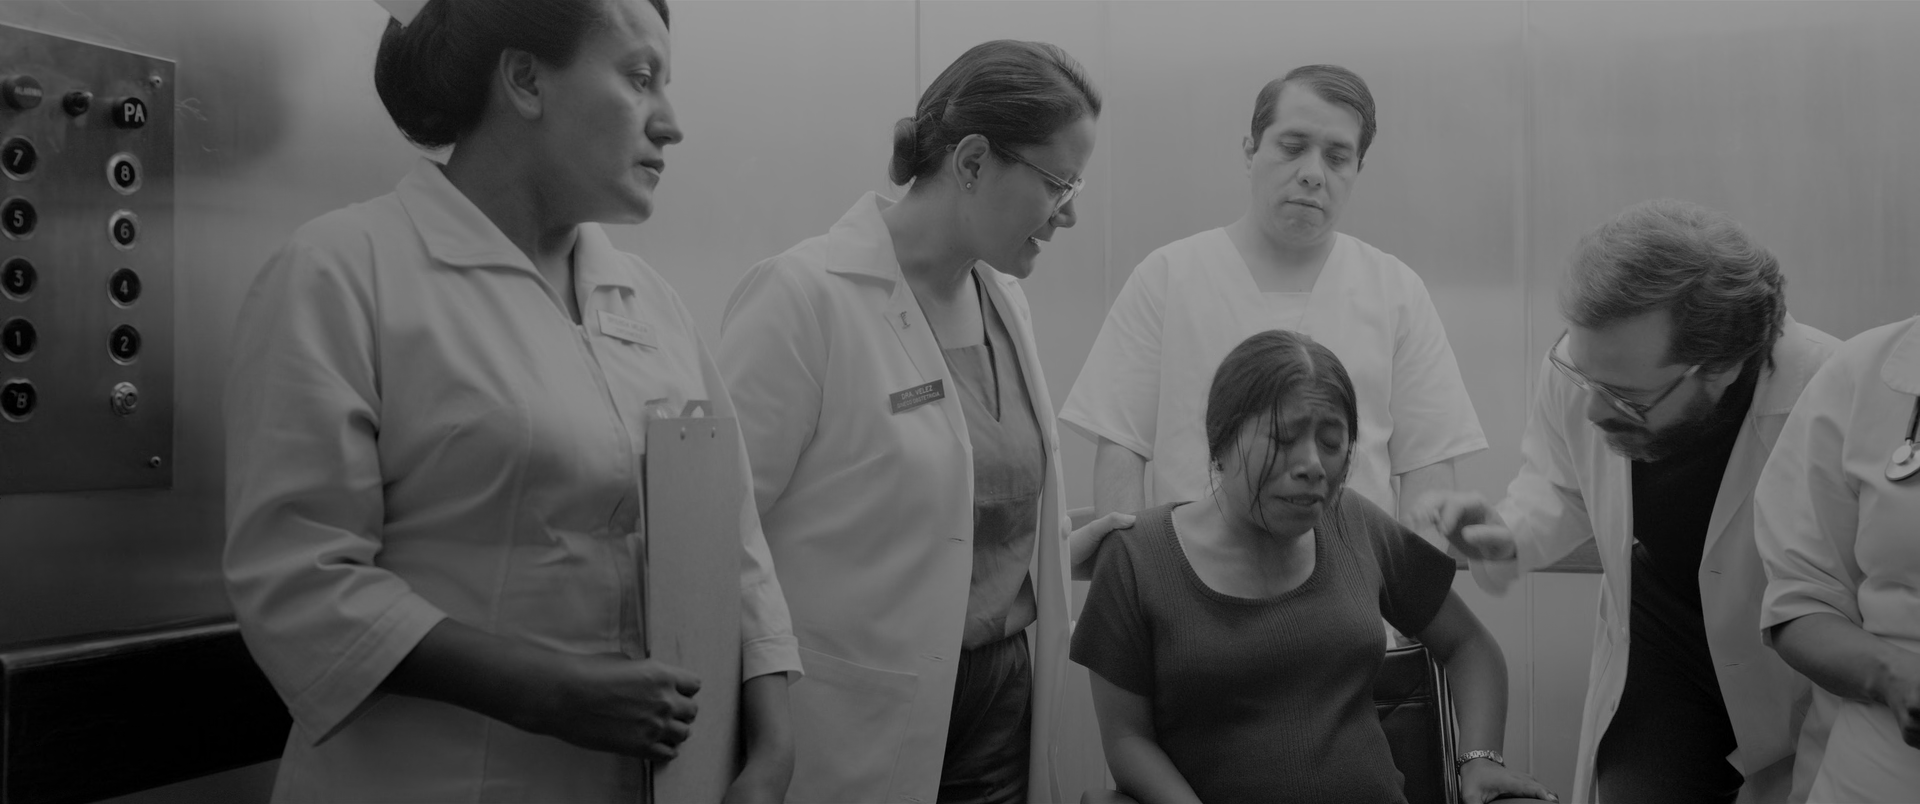
A step wedge in a hospital lift
Doctors, a nurse and an orderly in white stand close around a woman seated in a wheelchair in a lift; the whites are held below diffuse white and the seated figure is the darkest mass in the frame.
Five tonal clusters at L* 4, 22, 43, 69 and 92, each holding between 18% and 24% of the frame: an almost perfectly even staircase built from white cotton, skin, hair and dark clothing.
What is remarkable
The five measured tonal clusters land at L* 3.8, 21.8, 43.4, 69.4 and 92.4 and hold 23.8%, 18.8%, 19.5%, 19.7% and 18.2% of the picture. That is an even staircase in both position and weight, and it is the clearest statement in the study of what this film does instead of using colour: five materials that a colour grade would separate by hue — white cotton, a paler wall panel, skin, dark hair, dark clothing — are separated here by being placed at five distinct densities and given roughly equal area.
The whites are the interesting end. In the reference PNG as displayed the coats read as near-white, which is what a PQ still shown in an ordinary sRGB browser does to material at that level; the measurement is the reliable statement, and it says otherwise. Nothing in the group of coats and uniforms reaches diffuse white: the top cluster sits at L* 92.4, the 99th percentile at L* 107.5, and only 4.90% of the frame is above white — the panel highlight and the specular on the metal at the left. The coats are therefore rendered as fabric with a value, not as white, which is what allows four different garments to stay apart from one another.
The frame's floor is doing the opposite job. 31.06% of the picture is shadow at a mean of L* 6.87, 15.79% is deep shadow and 1.96% sits at code zero. The darkest cluster at L* 3.8 takes 23.8% of the frame, and it holds the seated woman's top and hair together with the men's trousers and the shadowed left wall. The subject of the shot is the darkest mass in it, surrounded by the brightest, and the centre measures 22.02 L* above the edge — the light is on the group and falls away at the borders.
Where the image comes from
Costume and production design supplied this. Five garments in five different whites and greys, a lift interior with pale panels and a steel button plate, and a soft overhead source that models faces without putting a specular on any coat — none of that is a grading decision. Nor is the casting of the seated figure as the frame's darkest area, which is a staging and wardrobe choice made before the camera was placed.
The grade owns the ceiling and the floor. Deciding that the whites stop at L* 92 rather than running to white is what keeps them separable; deciding that the dark top holds at L* 4 rather than at zero is what keeps the subject a person rather than a silhouette. Between those two decisions, the middle of the staircase mostly needs to be left alone.
Waveform · signal
Tone distribution
Cumulative tone
Can regular footage get there?
Conditional
Reaching a five-step wedge from five white and near-white garments needs the garments to differ before the camera sees them. On correctly exposed log or raw material the levels are easy; the separations are not recoverable if wardrobe supplied one white.
Minimum capture conditions
Soft, largely frontal or overhead light with no specular hit on any coat.
A wardrobe of genuinely different whites, off-whites and greys, and a set with its own mid-value panels behind them.
Capture latitude that keeps the brightest coat below diffuse white while a dark garment sits within a few L* of the floor without reaching it.
Composite and background read
A practical interior with nothing to explain
The light falls consistently on every figure from the same soft overhead source, the reflections in the steel button plate at the left correspond to the room, and the depth relationships between the four standing figures and the seated one are continuous.
Invisible cleanup — rig removal, panel repairs, reflections of crew in the steel — is neither visible nor excluded at this resolution.
Shot-specific Resolve pass
Use the global tree, then make these decisions
R03
Weight the conversion for skin against cotton
Set the channel weighting on the relationship between faces and the white garments immediately behind and beside them, before touching any grading control.
Why: With five whites in the frame, the conversion decides whether skin has anywhere to sit; no later node can re-separate them.
Watch: A weighting that lifts skin will also lift the paler wall panels behind the heads.
R05
Stop the whites below white
Place the brightest coat around L* 90–95 and let only the panel highlight and the steel specular pass diffuse white.
Why: Garments taken to white lose their differences to each other in the same move.
Watch: Check the shoulders and sleeves, where a coat catches the most light and merges first.
R07
Separate the five garments
Give one or two of the coats a small independent density move — three to eight L* — rather than raising contrast across the group.
Why: The staircase is already even; it needs maintaining, not building.
Watch: A qualifier built on one white garment will select all of them; restrict with shape.
R06
Hold the seated face
Track a soft window on the seated woman and set her face relative to the coats immediately behind her, not to an absolute level.
Why: She is the subject and she is the darkest area in a frame surrounded by the brightest.
Watch: Dark hair against the dark top is where this matte will fail; inspect that edge at full resolution.
R04
Keep the dark top off the floor
Shape the toe so the dark garment and hair keep structure above the 2% of the frame that is already at code zero.
Why: The difference between a person in dark clothing and a silhouette is a few L* here.
Watch: Confirm on a full-scale waveform; this separation is invisible on an uncalibrated display.
Failure modes to check before approval
Coat-to-coat separation is the first casualty of an SDR trim; check the trim before approving the white placement.
The shot runs 27.6 seconds with figures moving between the coats — verify that any garment window or qualifier does not crawl as one white passes in front of another.
Check the specular on the steel button plate across the take; it is one of the few things in the frame above diffuse white and it will move.
04 · Dynamic range · both ends inside one frame · shot 112 · 01:37:25:02
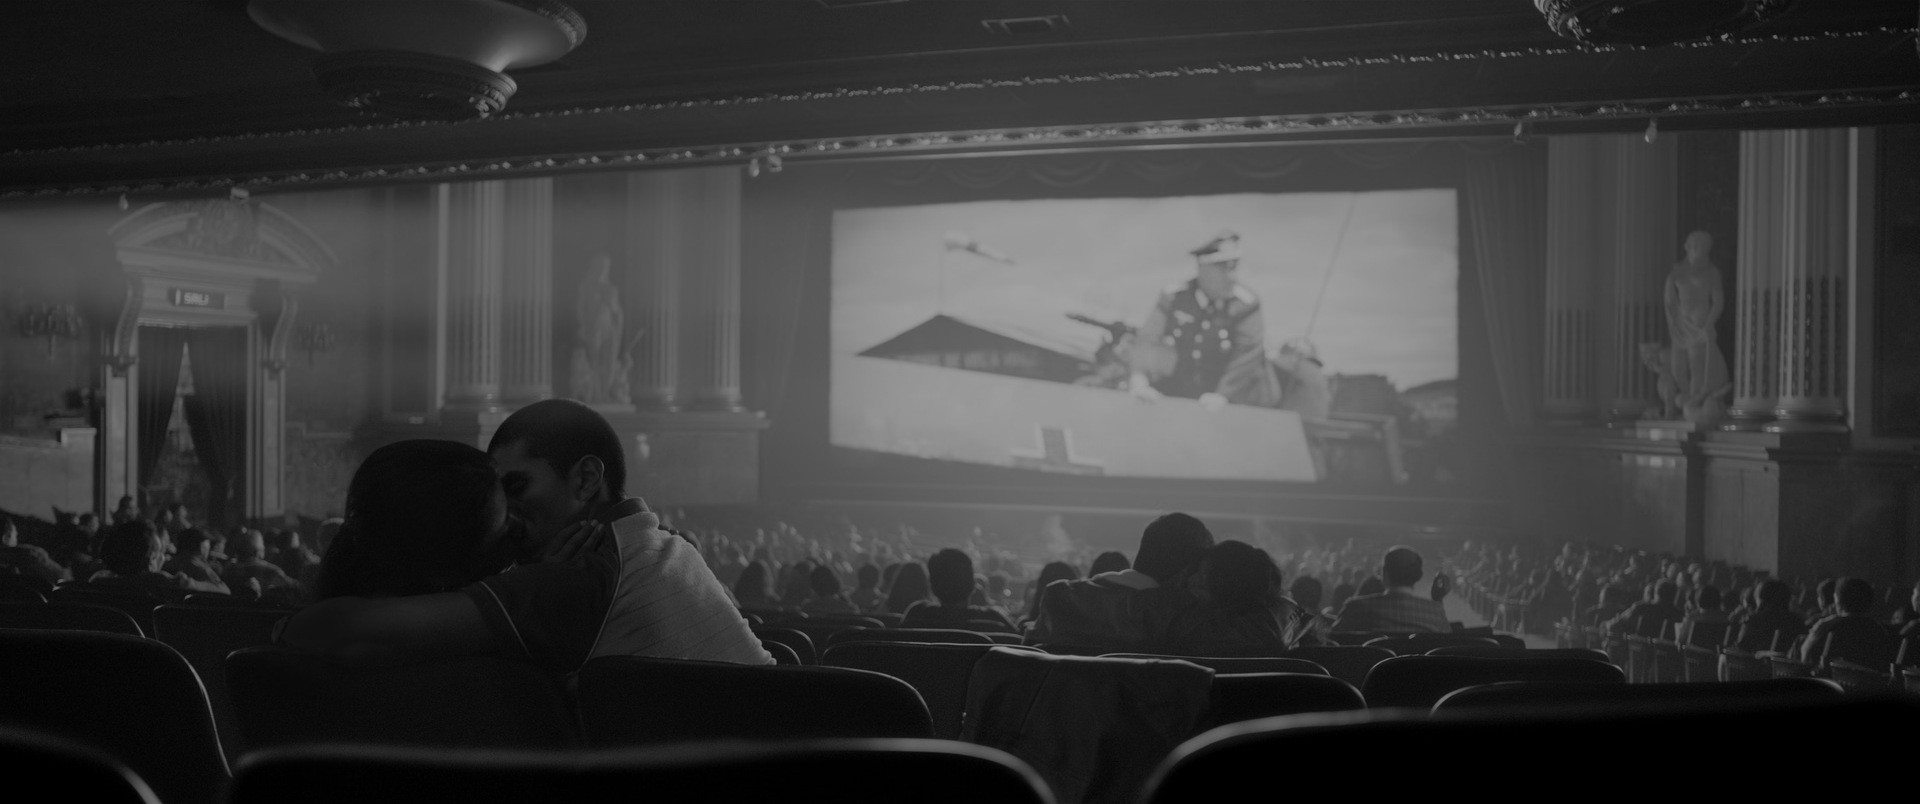
Ninety-eight L* between the screen and the seats
A cinema seen from the back of the stalls: the screen carries a bright war scene, the auditorium is a dark mass of heads and seat backs, and a couple at the centre left are lit only by what the screen returns.
Regular-footage feasibility: ConditionalComposite/VFX read: medium
Half the frame sits at L* 2.5 and eight per cent at L* 100.9: the screen and the auditorium are ninety-eight L* apart in the same photograph.
What is remarkable
The frame divides into two populations and a bridge. The largest tonal cluster holds 50.1% of the picture at L* 2.5; another holds 8.0% at L* 100.9, right at diffuse white. That is a ninety-eight L* separation inside a single photograph, and the measured centre-to-edge delta of 51.62 L* is the widest spatial split in this study against a corpus mean of 8.95. 62.00% of the frame is shadow at a mean of L* 5.01, 40.04% is deep shadow and 5.99% sits at code zero.
The bridge is what makes the image work rather than merely dramatic. 21.3% of the frame sits at L* 19.0 and a further 15.7% at L* 34.1 — the proscenium, the pilasters, the plaster statues in their niches and the rows of heads, none of which is lit by anything except the screen. The frame's total above diffuse white is 4.61%, so the screen is bright but is not permitted to run past white; it is the reference the whole room is measured against.
The couple at the centre left are the test case. They are read entirely by returned light, sitting only slightly above the seat backs immediately around them, and their edges are defined by the screen behind and to their right. Ten distinct lit regions are detected with the largest holding 31.71% of the frame — the screen and the beam of haze above the audience together, with the rest of the room broken into small separate patches.
Where the image comes from
The auditorium's plasterwork, the statues, the depth of the room and the haze in the projector beam are photographed, and the exposure balance between the screen and the seats is a lighting and camera decision taken on the day. So is the placement of the couple against the brightest part of the room rather than against the black of the stalls.
The grade owns three things: how far into the floor the auditorium is allowed to go, whether the plasterwork and the statues survive at L* 19 to 34, and where the screen stops. All three are one decision made three times, because the room is only readable if the screen is held at white rather than beyond it. Build the room first with the screen sitting where it lands, then place the screen.
Waveform · signal
Tone distribution
Cumulative tone
Can regular footage get there?
Conditional
Ninety-eight L* in one frame is inside the range of current large-format capture, but only if the room is genuinely lit to a few L* rather than left black, and only if the deliverable can carry both ends. On an SDR-only chain this frame is a choice between the audience and the screen.
Minimum capture conditions
A real projected image bright enough to light the room, or an equivalent practical source at the screen.
An auditorium with practical architecture — plasterwork, niches, pale pilasters — that can register at L* 19 to 34 on returned light alone.
Capture latitude covering the full split without noise in the stalls, and a deliverable that does not force a choice between the two ends.
Composite and background read
The screen image is a separately controllable element, however it was produced
The picture on the screen is by definition a second photographic image inside this one, and the production demand for exact control over its exposure, contrast and content makes an inserted element plausible. Against that, the haze in the projector beam above the audience, the fall of screen light onto the seat backs and the modelling of the nearest heads are all consistent with a real projection running in the room during the take.
A still cannot separate a real projection from a well-integrated insert; at this scale both leave the same evidence, and a medium reading here is about what the production plausibly needed to control, not about a visible seam.
Shot-specific Resolve pass
Use the global tree, then make these decisions
R04
Place the stalls without losing the room
Shape the toe so the seat backs and heads stay above the 6% of the frame already at code zero, and keep the plaster architecture at L* 19 to 34.
Why: Half the picture is at L* 2.5; the difference between a dark cinema and an empty rectangle is the material just above that.
Watch: Check on a full-scale waveform — none of this is visible on an uncalibrated display.
R05
Stop the screen at white
Place the screen's brightest area at or just below diffuse white and let nothing else in the frame approach it.
Why: The screen is the reference the entire room is read against; taken past white it stops being a surface.
Watch: The screen's own content changes constantly through the shot; place it on a representative moment.
R09
Shape the room, not an oval
Build the surround from the architecture — the proscenium arch, the line of the balcony, the rows of seat backs — using tracked shapes rather than a vignette.
Why: The frame already carries a 51 L* centre-to-edge split; the grade's job is to protect it without adding a visible gradient.
Watch: In a monochrome image a soft-edged window has no hue variation to hide in; check the corners.
R06
Find the couple in returned light
Track a small soft window on the two heads at the centre left and lift them a few L* relative to the seat backs beside them.
Why: They are the subject and they are lit by nothing but the screen.
Watch: A luma key will take the whole audience; restrict by shape and keep the move small.
R11
Give the screen element its own texture
If the screen image is a separate element, grade it with its own transform, black point and grain rather than forcing it to match the room.
Why: A projected image inside a photograph is not the same image as the photograph.
Watch: Any global noise reduction will flatten the projector haze, which is the only thing joining the two.
Failure modes to check before approval
Inspect what the 6% at code zero is actually losing — if it is seat detail rather than empty air, the toe is too low.
The haze in the projector beam will strobe if contrast is added into it; review the whole 6.8 seconds before approving.
An SDR trim will force a choice between the stalls and the screen; make it deliberately and check the couple survive it.
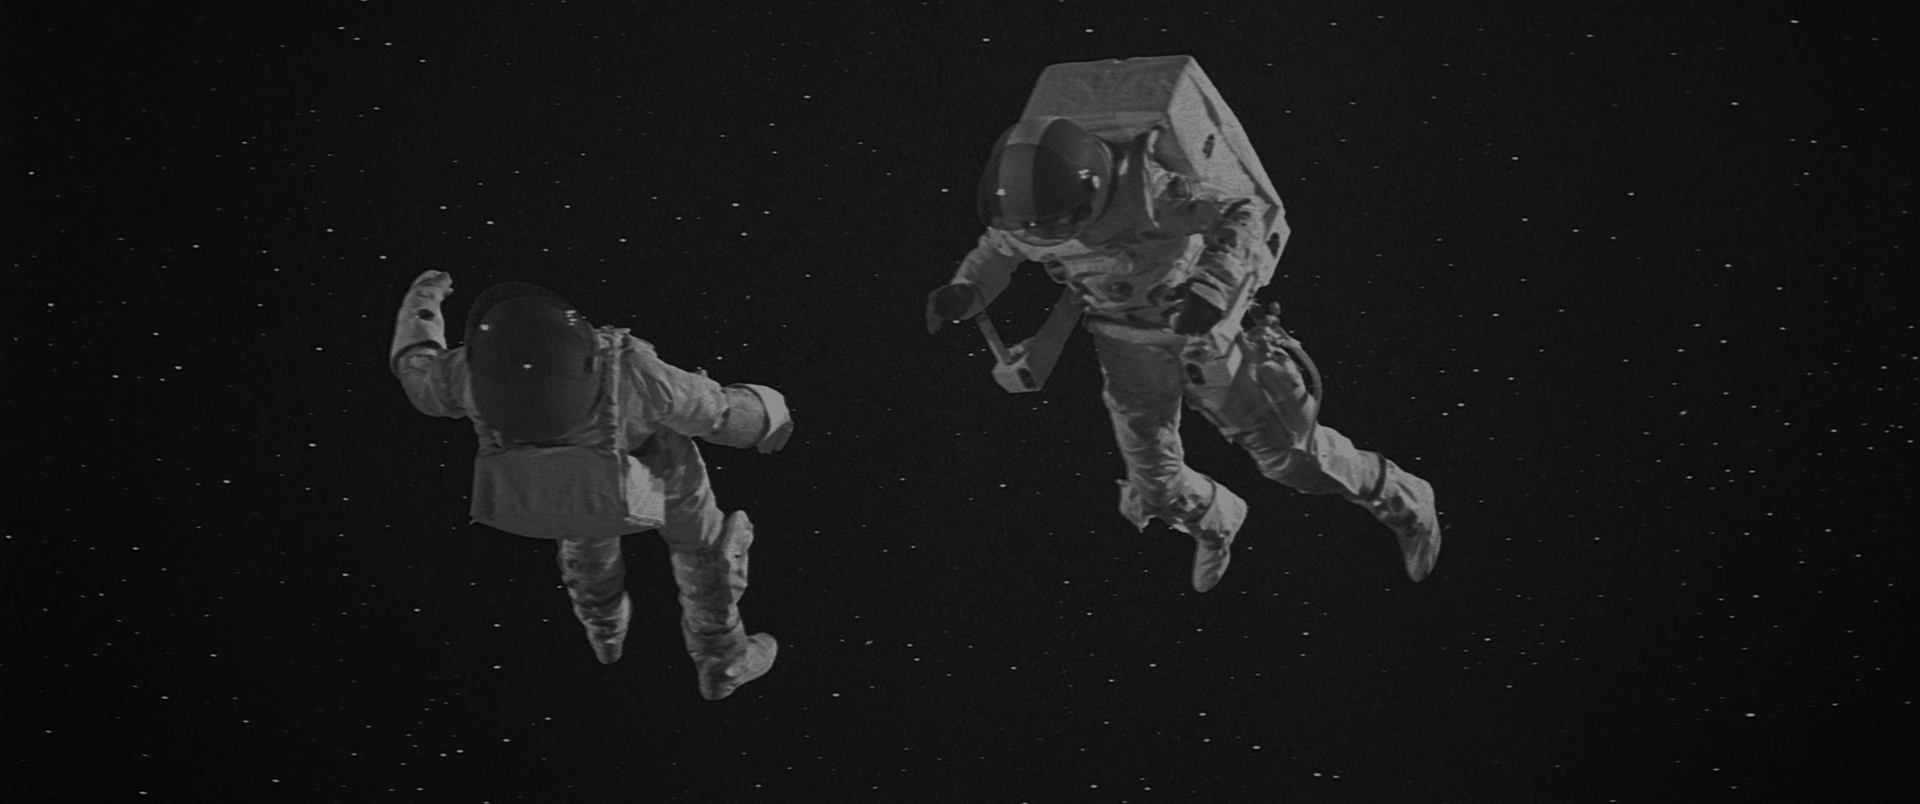
05 · The floor · an image this camera did not photograph · shot 190 · 02:13:30:18
A black one L* wide
Two figures in spacesuits drift against a starfield, filling the frame: inserted material screened inside the film, and the only image in the study with nothing at all above diffuse white.
Regular-footage feasibility: LowComposite/VFX read: high
89.1% of the frame is one tonal cluster at L* 0.7, and the shadow zone's own 10th-to-90th spread is 1.16 L* against a corpus mean of 14.38.
What is remarkable
This is the darkest image in the study at mean L* 3.55, and it is dark in a way the rest of the film is not. A single tonal cluster holds 89.10% of the frame at L* 0.7. 94.91% of the picture is shadow at a mean of L* 1.38 and 88.72% is deep shadow. What separates it from Roma's own night interiors is the structure inside that darkness: the shadow zone's 10th-to-90th-percentile spread is 1.16 L*, against a corpus mean of 14.38. This black is genuinely flat. The film's own blacks are a range; this one is a level.
At the other end it stops early. The 99th percentile is L* 66.01 and the brightest measured cluster sits at L* 74.2 holding 1.3% of the frame. Nothing here reaches diffuse white — 0.00% of the picture is above it — in a film where 52.9% of photographed frames carry a 99th percentile past L* 100. Sixteen distinct lit regions are detected and the largest holds 1.35% of the frame: two suits and a scatter of stars, and nothing else.
Nothing sits at code zero either. The starfield is held marginally above the floor rather than crushed to it. At full resolution the two figures carry an edge quality and a grain structure that differ from the field around them, and the star field itself is uniform in a way a photographed sky is not — the frame reads as constructed material rather than as a single photographic exposure, which is consistent with its being an insert of another film screened inside this one rather than this production's own photography.
Where the image comes from
Almost nothing here is available to a colourist working on Roma, and that is the point of including it. The image arrives as an element: its exposure, its grain, its matte work and its narrow tonal band were fixed by whoever made it, long before this film's grade existed.
What the grade owns is the decision not to intervene. The temptation with an element like this is to match it to the host film — lift the black into the film's own shadow range, extend the top toward the film's ceiling, reduce the grain so it sits with the surrounding photography. All three would falsify it. The correct work is a correct input transform, a floor that does not crush L* 0.7 to zero, and a delivery chain that leaves the difference intact.
Waveform · signal
Tone distribution
Cumulative tone
Can regular footage get there?
Low
This frame is a useful reference, not a reproducible candidate, and the report is settling for the former. Regular footage cannot get here because this is not regular footage: reaching this image means obtaining the element, transforming it correctly and choosing not to grade it into the film around it.
What does transfer is the discipline it demonstrates — a near-uniform black held at L* 0.7 without touching code zero, and a highlight ceiling deliberately left at L* 66 in a film that routinely runs past 100.
Minimum capture conditions
The actual element, with a documented transfer function and levels; nothing about this can be rebuilt from a plate.
A delivery chain that will not crush a large L* 0.7 field to zero or band it.
A deliberate decision, recorded and approved, not to match the element to the surrounding grade.
Composite and background read
Visibly built rather than photographed in one exposure
At full resolution the two suited figures carry an edge quality and a grain structure distinct from the field they sit in, consistent with figure elements composited over a separately produced starfield. The star field is uniform across the whole frame in a way an exposure of a real sky is not, and the black behind it is 1.16 L* wide where this film's own shadows average 14.38.
The reading is about the inserted element's construction, not about Roma's. It says this image was assembled from parts; it says nothing about how the cinema scenes around it were made.
A still cannot distinguish an optical composite from a digital one, cannot date either, and cannot identify the source; and the grain and edge cues that support this reading would be removed by any restoration or noise reduction applied downstream.
Shot-specific Resolve pass
Use the global tree, then make these decisions
R01
Transform the element on its own terms
Give the insert its own documented input transform, separate from the one used for the host photography.
Why: It did not come from this camera and it does not share the film's encode.
Watch: Confirm data versus video levels before deciding that a black at L* 0.7 is intentional.
R04
Do not crush 0.7 to zero
Place the toe so the starfield's background stays marginally above the floor, exactly as measured.
Why: The whole character of the element is a flat black that is nevertheless not empty.
Watch: Delivery encoding, not the grade, is the most likely place this is lost; check the final file.
R05
Leave the ceiling at sixty-six
Resist extending the suits toward the film's own highlight range; hold the brightest material near L* 66 to 74.
Why: In a film where half the frames pass L* 100, a ceiling this low is the element announcing itself, which is correct.
Watch: Any global shoulder built for the host film will lift this; exclude the element from it.
R11
Keep its grain and its edges
Bypass noise reduction and any grain matching on this element, and inspect the matte edges at full resolution before treating them as defects.
Why: The grain and the edge quality are the element's identity, not artefacts of this delivery.
Watch: A global NR pass applied at timeline level will strip them without anyone noticing on a scope.
R12
Check it survives the SDR trim
Confirm after the trim that the starfield still separates from the frame edge and that the suits have not flattened.
Why: An L* 0.7 field with 1.16 L* of structure is the most fragile material in the whole film.
Watch: Compare against the HDR pass on the same display chain rather than judging it alone.
Failure modes to check before approval
Any timeline-level noise reduction will remove the element's grain and expose its matte edges; verify this element is excluded.
Inspect the matte edges around both figures at full resolution across the whole 18.1 seconds before recording them as damage.
Confirm on the final deliverable that the starfield has not been banded or crushed by the encoder rather than by the grade.
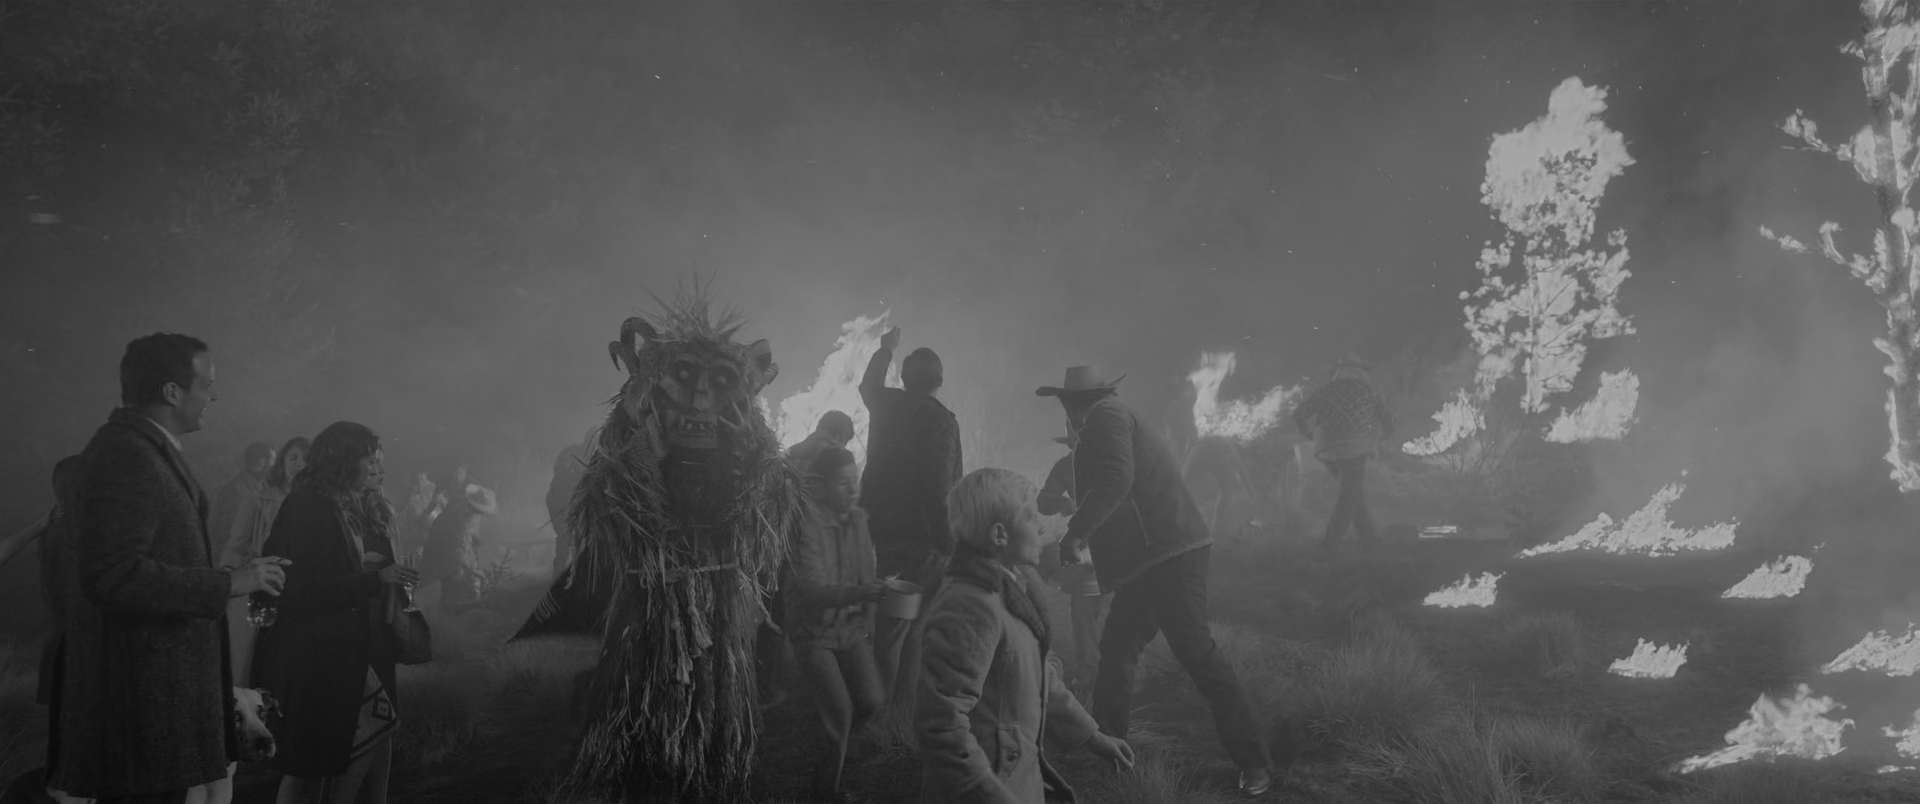
06 · Source and atmosphere · fire seen through its own smoke · shot 174 · 02:04:40:12
Sixty-two per cent midtone, with the only white in the flames
A crowd in coats stands in smoke watching a grass and woodland fire; a figure in a shaggy horned costume stands at the centre left and burning trees fill the right of the frame.
The smoke pulls 61.58% of the frame into the midtone zone against a corpus mean of 37.93%, and leaves 3.57% of the picture — the flames, and nothing else — above diffuse white.
What is remarkable
Smoke is doing the grading here and the measurements show exactly what it does. 61.58% of the frame is midtone against a corpus mean of 37.93%; the shadow zone is 29.78% and the highlight zone 8.64%. Everything the veil covers is pulled toward the middle of the scale together, and the frame's 10th-to-90th spread of 58.04 L* is almost exactly the corpus mean of 58.00 despite containing open flame.
The exception is the fire itself. One tonal cluster holds 4.3% of the frame at L* 114.7, and the total above diffuse white is 3.57% — which is, remarkably, the film's own average. A frame with burning trees in it is no more above-white than the average Roma frame, because the smoke returns most of the fire's output as a mid-grey field rather than letting it reach the sensor as highlight.
The connectivity measurement is the clearest evidence of the veil. Only four distinct lit regions are detected in the whole frame, and the largest holds 68.26% of it. In a picture containing perhaps a dozen separate flames, a crowd, a costume and a treeline, the smoke has merged almost everything into one continuous lit field — which is precisely the problem the grade has to solve, because a continuous field has no depth in it. The centre measures 17.69 L* above the edge, so what depth there is comes from the fire's position rather than from the atmosphere.
Where the image comes from
The fire, the atmosphere, the costume's straw texture and the coats are all photographed, and the exposure that keeps the crowd in the middle of the scale while flame passes L* 114 was set on the day. The costume in particular cannot be helped downstream: it is a mass of fine straw against a mid-grey field, and if the capture did not resolve it, no amount of local contrast will invent it.
The grade owns the depth. With the smoke merging two-thirds of the frame into one lit region, the reconstruction's job is to put separation back between the near group at the left, the costumed figure, the man at the fire and the burning treeline — using density and micro-contrast, not by thinning the veil, which is the film's subject rather than an obstacle to it.
Waveform · signal
Tone distribution
Cumulative tone
Can regular footage get there?
Conditional
Real fire, real atmosphere and a crowd at a safe distance can produce this, but the exposure has to be set for faces at about L* 40 while flame runs eighty L* above them, and the atmosphere has to be in the air rather than added later. Smoke created in post will not merge the lit regions the way this does.
Minimum capture conditions
Practical fire at a controllable distance, with the crowd genuinely lit by it.
Atmosphere present at capture, dense enough to veil the background but thin enough to leave face modelling.
Capture latitude to hold flame above diffuse white while faces sit near the middle of the scale, and enough resolution to keep the costume's straw texture.
Composite and background read
One ambiguous cue in a frame that otherwise integrates completely
The atmospheric falloff is continuous from the foreground group to the burning treeline, the flames light the nearest figures consistently with their positions, and the smoke passes in front of and behind the same elements. Against that, a burning treeline at this scale is exactly the sort of element that gets augmented, and a still cannot show whether the fire visible in the background is the fire that lit the foreground.
Practical fire remains at least as plausible as any digital explanation here, and no still can settle it; only production documentation or a plate could.
Shot-specific Resolve pass
Use the global tree, then make these decisions
R10
Place the veil before anything else
Set the level of the smoke field first — around L* 30 to 40 — and only then decide how much contrast the frame can carry.
Why: Almost two-thirds of the picture is this one field; everything else is measured against it.
Watch: Contrast added into smoke reveals its movement; check across the take, not on the still.
R05
Let only the flames pass white
Hold the fire's cores above diffuse white at around L* 110 to 120 and keep everything the smoke touches below it.
Why: Only 3.57% of this frame is above white and it is all flame; that ratio is the image.
Watch: Flames flicker, so place the shoulder on a representative moment and verify at the extremes.
R09
Put depth back into one lit region
Use soft depth-shaped windows to hold the left-hand group slightly darker than the costumed figure and the treeline slightly lighter, restoring the separation the smoke removed.
Why: The frame has merged into a single lit field covering 68% of the picture, and a single field has no depth.
Watch: A depth window becomes visible the moment the atmosphere thins; check the whole 151 seconds.
R07
Keep the costume's texture
Add local contrast to the straw of the costume only, restricted by shape, and leave the surrounding smoke untouched.
Why: The costume is the frame's subject and its only fine texture; the veil is trying to take it.
Watch: Any noise reduction upstream will have removed this already; check before compensating for it.
R03
Weight firelight on skin
Set the conversion weighting so faces lit by flame separate from the smoke behind them rather than matching it.
Why: Firelit skin and mid-grey smoke are the two things most likely to land on the same density.
Watch: A weighting chosen for the faces will also change how the flames themselves render.
Failure modes to check before approval
The shot runs 151 seconds — over two minutes of moving smoke, moving crowd and flickering fire. Nothing in this recipe can be approved on a still.
Any luminance qualifier will pump with the flame's flicker; use shapes and tracking rather than keys wherever possible.
Check that added local contrast in the smoke does not raise the noise floor of the dark left-hand group, which is the quietest part of the frame.
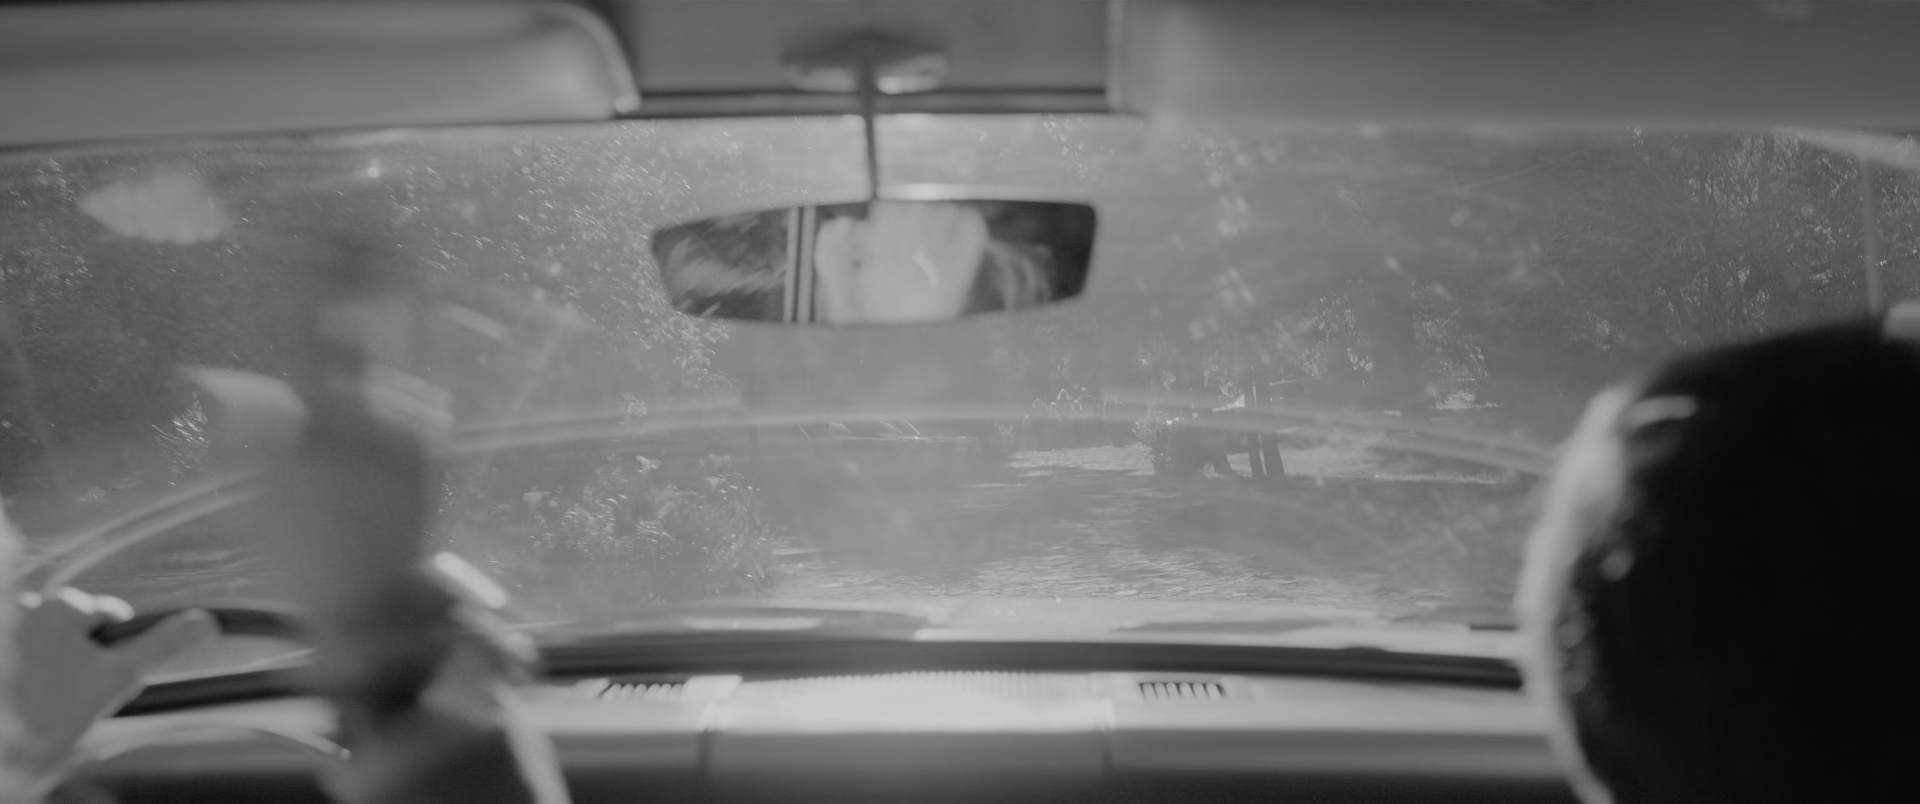
07 · Optics · dust, glare and the highest measurement in the corpus · shot 146 · 01:53:04:14
A windscreen at L* 182
The inside of a car looking forward through a dusty, scratched windscreen: a rear-view mirror with a face reflected in it, a wiper arm across the glass, a dark head at the right.
The 99th percentile here is L* 182.6, the highest measurement anywhere in the 303-shot corpus, and 1.02% of the frame is above 1000 cd/m².
What is remarkable
This frame holds the corpus record. Its 99th percentile is L* 182.65, the highest of all 303 shots, and 13.13% of the picture sits above diffuse white with 1.02% above 1000 cd/m². Its per-frame σL* of 38.91 and its 10th-to-90th spread of 103.73 L* are both the widest in this study. The measured tonal clusters run 6.5, 43.7, 79.9, 117.2 and 176.5 — a ladder that starts at the floor and finishes eighty L* past white.
What produces it is dirt. The windscreen is dusty and finely scratched, and a scattering surface converts a directional source into a field: the analysis detects a single connected lit region covering 85.23% of the frame, with a lit-region share of 100.0%. The whole glass is one luminous object. That is why the centre measures 48.97 L* above the edge — the scatter is strongest where the light comes through, not where the composition wants attention.
Against that field, the frame's dark material is doing all the compositional work: 16.9% of the picture at L* 6.5, which is the dark head at the right edge, the wiper arm and the dashboard. The one place with any subject in it is the rear-view mirror at the top centre — a small rectangle carrying a reflected face, sitting inside the brightest part of the picture and barely separated from it.
Where the image comes from
The dust on the glass, the scratches, the low sun angle and the decision to shoot through all of it rather than around it are photographic and are the entire content of the image. So is the mirror's position, which puts the only face in the picture inside the frame's brightest area rather than against its dark right edge.
The grade owns the headroom. This frame sets the ceiling for the whole film, so where its shoulder is placed is a film-level decision made on one shot. It also owns the temptation to clean up: raising contrast to cut through the veil will make the dust crawl and will destroy the reason the shot exists. The correct approach is to shape the glare and to protect the mirror, not to reduce either.
Waveform · signal
Tone distribution
Cumulative tone
Can regular footage get there?
Conditional
Real dirty glass and a low sun will produce this on any capable capture, but very little of it survives an ordinary pipeline. The specular field has to be allowed past white without clipping, and the delivery has to carry thirteen per cent of a frame above SDR white.
Minimum capture conditions
Genuinely dusty, scratched glass — the scatter is a property of the surface, not of the lens.
A low, roughly frontal source and an exposure placed for the interior rather than for the road beyond.
HDR capture and delivery with enough headroom to keep material at eighty L* above white unclipped, and an SDR trim built deliberately rather than derived.
Composite and background read
One continuous optical event
The scatter pattern follows the curvature of the glass, the wiper arm occludes it correctly along the bottom, and the mirror carries its own independent reflection of the cabin at a different angle from the windscreen's reflection of the trees. Everything visible is explained by one piece of dirty glass and one source.
Cleanup — a removed crew reflection, a repaired highlight — is neither visible nor excluded here; a veiled frame is a good place to hide work and a bad place to detect it.
Shot-specific Resolve pass
Use the global tree, then make these decisions
R05
Set the film's ceiling on this shot
Build the shoulder so the brightest scatter reaches roughly eighty L* above diffuse white and rolls rather than stops; check that nothing lands on the top code.
Why: This is the film's highest measurement, so the shoulder decided here governs every other frame.
Watch: Verify on a full-scale waveform; at this level the difference between rolling and clipping is invisible by eye.
R10
Shape the glare, do not remove it
Use a soft window following the strongest part of the scatter to hold it a few L* down, rather than adding contrast across the glass.
Why: The veil is the subject of the shot; contrast through it makes the dust crawl and produces a different image.
Watch: Check the window across the whole 23.3 seconds — the scatter moves as the car does.
R06
Protect the mirror
Track a small window on the rear-view mirror and hold the reflected face two or three L* clear of the glass immediately around it.
Why: It is the only subject in the frame and it sits inside the brightest area.
Watch: The mirror moves with the vehicle; a static window will slide off it within a second.
R04
Keep the dark edge structured
Hold the head at the right edge, the wiper arm and the dashboard above the floor, with structure, at around L* 5 to 10.
Why: 17% of the frame is this material and it is all that gives the image a shape.
Watch: Nothing here is at code zero in the source; if your reconstruction crushes it, the toe is wrong.
R12
Trim this frame first
Build the SDR trim on this shot before any other, deciding explicitly what happens to the thirteen per cent above white.
Why: If the trim survives this frame it will survive the film; if it is derived from an ordinary interior it will fail here.
Watch: Confirm the mirror is still readable after the trim.
Failure modes to check before approval
Any attempt to cut through the veil with contrast will make the dust and scratches crawl across the take; review the full 23.3 seconds before approving.
A highlight qualifier will chase the moving reflections across the glass; use tracked shapes instead.
On an SDR trim, thirteen per cent of this frame collapses toward one value — check the mirror and the wiper arm specifically, not the overall impression.
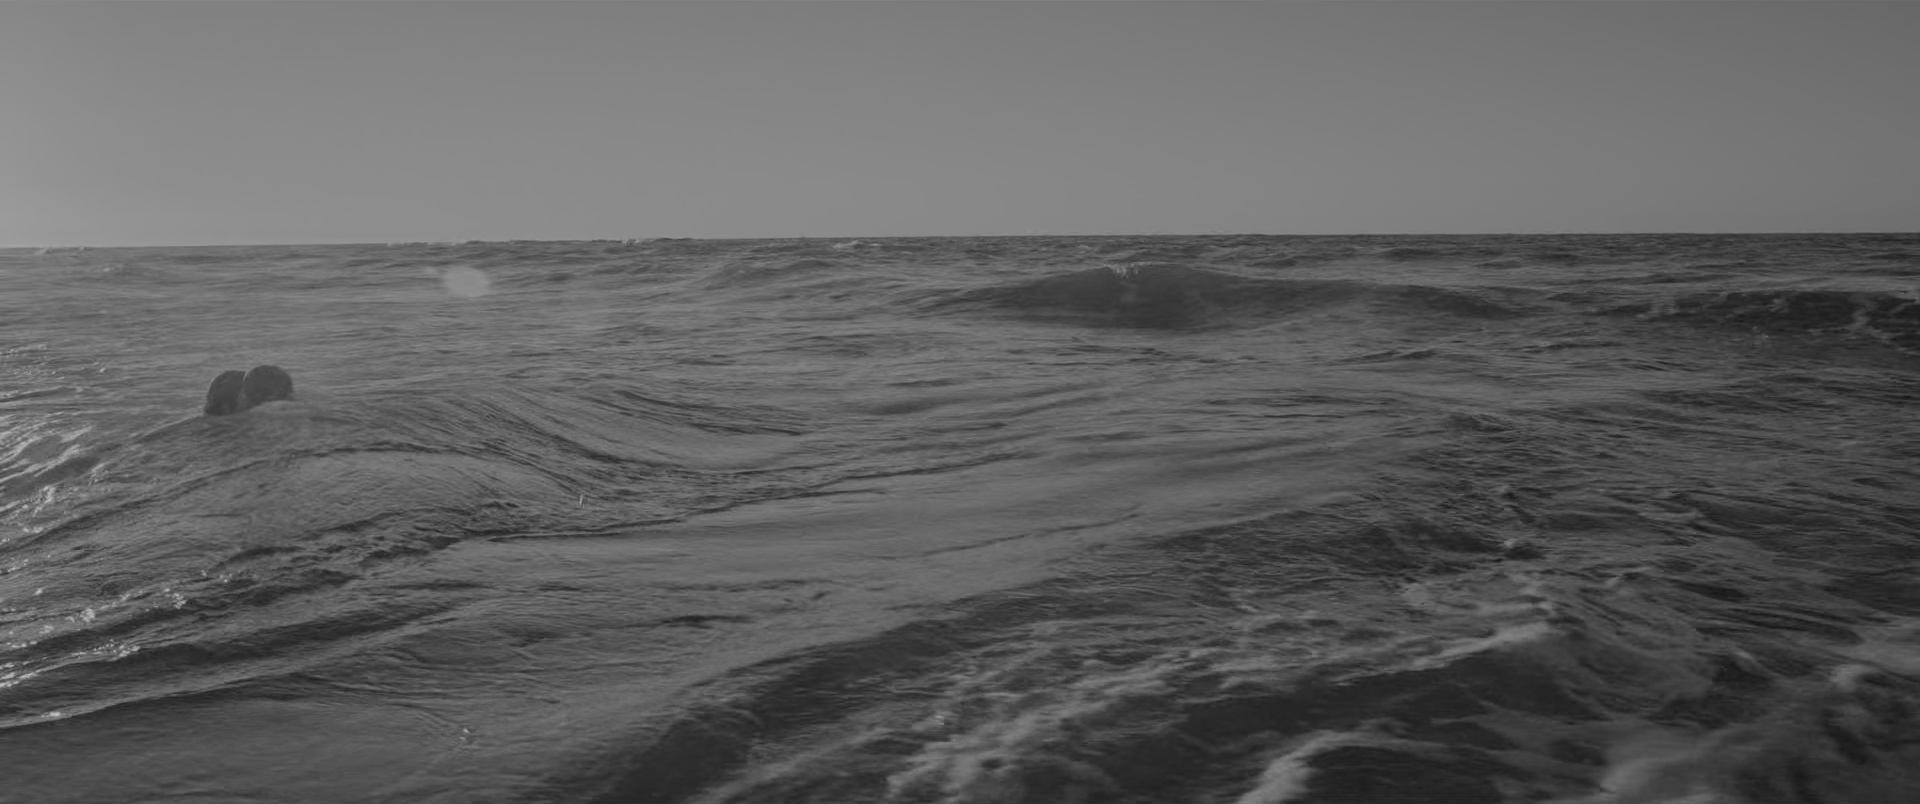
08 · Texture · when texture is the only separator left · shot 288 · 03:01:31:10
A field with no structure and two heads in it
Open sea fills almost the whole frame under a narrow band of flat pale sky, waves running diagonally toward the camera, with two small dark heads just visible at the left.
The centre of this frame measures 1.29 L* below its edge, against a corpus mean of 8.95: there is no spatial structure here at all, and the only thing separating the two heads from the water is that they are darker than it.
What is remarkable
This is the flattest frame in the study by a wide margin. The centre-to-edge lightness delta is −1.29 L* against a corpus mean of 8.95, so the picture has effectively no spatial organisation: no bright centre, no dark surround, no gradient across it. The five tonal clusters are spread evenly from L* 12.8 to L* 82.1 and carry near-identical shares of 21.7%, 22.0%, 19.8%, 17.0% and 19.4%. That distribution is not organised into regions; it is distributed across the whole surface, one wave face at a time.
Apart from the inserted element in study 05, it is also the only frame here whose 99th percentile stays below diffuse white, and the only photographed one: the 99th percentile is L* 95.31 and just 0.46% of the picture sits above white — in a film where 52.9% of frames run past L* 100 and where a face against a sky elsewhere reaches 120. At the other end there is nothing at code zero and only 1.96% in deep shadow. The entire image lives between about L* 4 and L* 95, using the middle of the scale and neither end of it.
Eight distinct lit regions are detected with the largest holding 75.13% of the frame: the wave structure breaks the surface up but does not divide the picture. And the frame's whole dramatic content — two heads — is a mass a small fraction of one per cent of the picture, held in place by nothing except being darker than the water around them. At 233.7 seconds this is the longest shot in the study and the fifth longest in the film, so this frame stands in for nearly four minutes of a moving sea.
Where the image comes from
Everything that makes this frame readable was photographed: a low camera close to the water, a high horizon that leaves the sky as a narrow band, a low sun angle that gives the wave faces their tonal difference, and performers dark enough against the water to register at that size. The faint bloom at the upper left is optical and belongs to the take.
The grade owns micro-contrast and nothing else. With no spatial structure, no colour and no highlight, the only variable left is how much difference there is between one wave face and the next — and that is a decision about the noise floor as much as about contrast, because the same move that separates the water raises the grain of the whole frame.
Waveform · signal
Tone distribution
Cumulative tone
Can regular footage get there?
Conditional
Photographically this is a real sea, and reaching it needs the light and the camera height rather than the grade. What makes it conditional is that almost nothing can be repaired afterwards: if the capture did not resolve the wave faces or hold the heads against the water, no grade puts either back.
Minimum capture conditions
Low, roughly raking daylight that models the wave faces; flat overhead light gives a grey field with no separation in it.
A camera position close to the water with a high horizon, so the sky cannot become the subject.
Enough capture resolution and latitude to keep water texture clean, because every later micro-contrast move multiplies whatever noise is there.
Composite and background read
Production demands make water work plausible; the frame shows no cue for it
A sustained sequence photographed at water level with performers in the surf is a strong practical reason to expect plate work, stabilisation or water augmentation somewhere in it. Against that, this frame's wave structure is internally consistent across its whole width, the falloff toward the horizon is continuous, and the flare at the upper left behaves as an optical event on the taking lens.
A single midpoint frame from a 233-second take can neither confirm nor exclude work elsewhere in the shot, and water augmentation is among the least detectable kinds of work in a still.
Shot-specific Resolve pass
Use the global tree, then make these decisions
R08
Set the water's level and leave it
Place the sea's mid value near L* 43 and confirm the 10th-to-90th spread stays near 68 L*; do not add a gradient.
Why: The frame has no spatial organisation and any gradient introduced will be read as one.
Watch: Check the horizon band separately; it is the only place a lift will show.
R07
Work on micro-contrast, not contrast
Raise local contrast in the water only, in small increments, watching the wave-face separation rather than the overall look.
Why: The separations here are between adjacent wave faces a few L* apart; global contrast moves the whole field together and separates nothing.
Watch: Every increment raises the noise floor of the entire frame; check the darkest troughs.
R06
Hold the two heads
Confirm the heads keep at least eight to ten L* of separation from the water immediately around them, using a small tracked window if they do not.
Why: They are the subject and they are a fraction of a per cent of the frame.
Watch: They move relative to the waves for nearly four minutes; a window has to track water, not a fixed point.
R05
Let this frame stay below white
Keep the foam and the sky band below diffuse white, with under one per cent of the frame above it.
Why: It is the only photographed frame here that stays essentially below white, and that is what makes it read as a real sea rather than a lit one.
Watch: A global shoulder built for the film's brighter frames will push the foam past white here; check after any film-level change.
R11
Leave the texture alone
Keep noise reduction off this shot entirely, and check the wave detail at full resolution before and after any texture node.
Why: Texture is the only separating mechanism the frame has.
Watch: A timeline-level NR pass will flatten the water without registering on any scope.
Failure modes to check before approval
This midpoint frame stands for 233.7 seconds of moving water; nothing about the wave separation can be judged from it alone.
Confirm that raised micro-contrast does not make the water sparkle or crawl on the moving image, which is the usual failure here.
Check the two heads at every point in the take, not at the midpoint — they submerge, and a window built on this frame will lose them.