Grade reconstruction report · 2007

Ochre Light and the Faces That Turn Away

Eight frames in which desert daylight is built as a warm, hard-shouldered field, black costume is held above crushed black, faces keep the side light that models them, and night, fluorescent tube and muzzle flash each ask for a different separation.

No Country for Old Men looks restrained rather than muted. By the repository's temporal analysis most of its colour movements are warm-neutral or amber, none more than restrained, and its desert exteriors sit in a narrow ochre family where rock, grass, road and sky differ mainly in value. Inside that family small colours carry weight: a red sign, a blood-soaked seat, amber headlights, a cyan tube.

Four of the eight studies come from the two scenes analysed frame by frame in this repository's scene consistency reports: the lava ridge and the dead man in the truck from The Morning in the Desert, and the Texaco sign and Chigurh across the counter from The Confrontation at the Counter. Where those reports measured something about a frame, a face, a window or a surround, the study says so and names the measurement. The other four cover night, narrow-spectrum light, a two-frame muzzle flash and the film's last face against a window.

Subject
No Country for Old Men
Studies
8 frames
Measured against
1382 eligible midpoint frames
Interpretation
gamma24

The film-level construction

What holds the look together

The desert is one warm family divided by value

Rock, dry grass, road dust and even the overcast sky share positive b*: in the ridge setting of the desert scene the rock renders b* +28 and the sky +15 to +19, and they differ far more in lightness than in hue. Pushing sky blue or rock orange to separate them breaks the family; separation comes from density and shoulder.

Black costume is dense, not empty

Chigurh's coat and hair render close to L* 0 in the confrontation's measured regions, yet the frames still show collar, seams and cloth against darker gaps. The toe is shaped so black costume sits just above true black, with the deepest shadows reserved for gaps and interiors.

Side light stays on the face

The confrontation's landmark cheek patches differ by 3.3 to 5.9 stops across its faces: hard light from one side, with the far cheek left in shadow. Face work lifts eyes and the lit plane; it does not fill the shadow side, because in that scene the face's rendered level follows the head's turn inside a stable light.

Small colours are events

A red sign, dried blood, amber headlights and a cyan tube each occupy a small share of a restrained frame. They are protected from global palette compression and adjusted, if at all, in their own qualifiers, so that their rarity rather than their saturation carries them.

Resolve blueprint

A node tree built to be adjusted, not copied blindly

Normalize known camera originals into DaVinci Wide Gamut / DaVinci Intermediate with Resolve Colour Management or a documented input CST, and give scanned film or VFX plates their own correct input transforms. Place exposure from skin and from the brightest surface that must keep texture, usually sky, window or white hat, before any palette work.

Keep environment, skin/costume and practical-light colour in separable branches. The look depends on density differences inside a narrow warm family and on hard side light that the grade must not fill: a flattening move that makes a face easier to see removes the modelling the photography supplies. Suggested settings are starting ranges for suitable log/raw footage, never recovered originals.

Group Pre-ClipN01

Input transform

Normalize camera, scan and VFX sources correctly before interpreting warm desert, dense black or cyan practicals as a look.

Do this

  • Decode raw from camera metadata, or transform documented log/scan data into DaVinci Wide Gamut / DaVinci Intermediate.
  • Give plates and flash or muzzle elements their own input transforms before compositing.
  • If project colour management already performs the IDT, omit this node rather than doubling it.

Starting points

  • Keep creative tone mapping out of the input stage; display mapping belongs in N13.
  • For comparison with the supplied reference only, use Rec.709 gamut and provisional gamma 2.4 as an explicit assumption.

Watch

  • A wrong transfer makes desert highlights and black-coat density impossible to judge.
  • Confirm data/video levels before treating a lifted floor or clipped sky as intentional.
Clip · serialN02

Exposure and neutral anchor

Place exposure from skin and from the brightest surface that must keep texture, and balance from credible neutrals without removing desert warmth.

Do this

  • Use Offset for the main exposure move, then HDR Global or Log wheels for zone placement.
  • Choose neutrals from grey metal, concrete or white paint only after checking they are not lit by sky or practical.
  • Set faces from texture and modelling on the lit side, not from average face luminance.

Starting points

  • Begin within about ±0.35 stop on well-exposed log material.
  • Keep temperature and tint corrective; build the ochre family in N04 and N06.

Watch

  • Auto-neutral on dust or sky strips the warm family and turns skin pink.
  • Exposing for the shadow side of a face fills the side light the frame depends on.
Clip · serialN03

Hard shoulder and dense toe

Hold sky, windows and white hats just below clipping with texture, and build a toe where black costume sits above the deepest gaps.

Do this

  • Shape a firm but rolled shoulder with HDR Highlights/Specular or Custom Curves.
  • Build the toe separately so coat and hair keep a small step above true black.
  • Keep midtone contrast moderate in exteriors; the photography supplies hard light.

Starting points

  • Try contrast around 1.06–1.20 with pivot 0.40–0.50, then shape toe and shoulder independently.
  • Use a soft clip only as a final guard for skies and windows.

Watch

  • A hard clip turns overcast sky and window light into flat paper.
  • Crushing black costume to 0 loses collar and seam and makes figures cut-outs.
Clip · serialN04

Warm-neutral palette compression

Draw rock, grass, dust and sky into one warm family by compressing hue spread and chroma, without neutralizing them.

Do this

  • Use Hue vs Hue and Hue vs Sat to narrow the yellow-orange spread and reduce stray greens.
  • Pull high-chroma outliers in the environment down before they compete with narrative accents.
  • Leave hue compression out of skin, blood and practical keys (N05, N07).

Starting points

  • Start with 5–15° of hue narrowing around yellow-orange and 10–25% saturation reduction on outliers.
  • Judge on a vectorscope and on the picture together; the family is narrow, not grey.

Watch

  • Over-compression makes the desert beige and removes the difference between rock and sky.
  • Compression that reaches skin turns faces sallow.
Clip · parallelN05

Skin, costume and narrative colour

Protect skin density and hue, keep black and plaid costume distinct, and hold small narrative colours such as signs and blood.

Do this

  • Key skin with a soft HSL qualifier intersected with face windows, and adjust lit-side density only.
  • Use separate small qualifiers for red signage, dried blood and practical accents.
  • Keep plaid and denim from converging with the environment family.

Starting points

  • Adjust skin by small amounts: 0.1–0.25 stop of density, a few degrees of hue.
  • Protect narrative reds from N04 rather than adding saturation to them.

Watch

  • A skin key that spreads into warm walls or rock lifts the whole frame.
  • Saturating blood reads as fresh and theatrical; the frames show it dark and dried.
Clip · parallelN06

Sky, window and exterior field

Place skies and daylight windows as a separate density so the exterior keeps texture and the interior keeps its own exposure.

Do this

  • Use a luminance key intersected with sky or window shapes; track windows through camera moves.
  • Adjust exterior density and a small amount of warmth or coolness independently of faces.
  • Keep window frames and mullions out of the key edge.

Starting points

  • Start with −0.2 to −0.6 stop on the exterior field and a soft 3–8 px key edge.
  • Match the sky's b* to its setting rather than to a single film-wide sky target.

Watch

  • Halos around hats, heads and mullions where the key edge is too hard.
  • An over-darkened window makes a daylight interior read as night.
Clip · parallelN07

Practical and narrow-spectrum light

Hold the colour of fluorescent tubes, headlights, lamps and flashes as sources in the frame, separately from the balance of the scene.

Do this

  • Key practicals and their pools; adjust hue and density of the source separately from the surround it lights.
  • For fluorescent cyan-green, keep the cast in walls and shadows while protecting a little warmth in skin.
  • For headlights and lamps, keep a warm core without clipping the whole bloom.

Starting points

  • Start with small hue moves (±5–10°) inside the practical key.
  • Leave the cast of a narrow-spectrum source in the image; do not neutralize it away.

Watch

  • Neutralizing a fluorescent scene removes its reason to look ill.
  • A key on a bloom edge breaks into rings or steps.
Clip · serialN08

Local light shaping and face hierarchy

Shape attention with soft windows that follow real light: lift eyes and the lit plane of a face, deepen unlit walls, keep the shadow side of the face.

Do this

  • Use soft tracked windows on faces and on the brightest distracting surfaces.
  • Deepen large unlit areas only where the photography already places darkness.
  • Never fill the shadow cheek to equalize a side-lit face.

Starting points

  • Start with +0.1 to +0.3 stop on a face window and −0.2 to −0.5 stop on distracting surround.
  • Feather windows generously (30–60% of window size).

Watch

  • A face window that lifts the shadow side removes the modelling the scene reports measure.
  • Visible window drift across a moving head or camera move.
Clip · serialN09

Luminance-dependent colour

Keep chroma in dark and bright zones believable: dense shadows slightly desaturated, highlights rolling off without hue shift.

Do this

  • Use Lum vs Sat to reduce chroma in the deep toe and in near-white highlights.
  • Check sky and window shoulders for hue shift toward cyan or magenta.
  • Keep warm midtones carrying the family's chroma.

Starting points

  • Start with 10–30% saturation reduction below about 10% luma and above about 90%.
  • Watch the vectorscope trace of skies as the shoulder is shaped.

Watch

  • Coloured noise in dense black costume and interiors.
  • Hue-shifted skies after a strong shoulder.
Clip · parallelN10

Night and dusk construction

Build night and dusk as blue-cyan density above deep black with warm practicals kept, without crushing silhouettes into the ground.

Do this

  • Separate sky, land and practical keys; keep a small value step between silhouette and land.
  • Carry blue into sky and mids, keep the toe close to neutral, let practicals stay warm.
  • For day-for-night or late-dusk material, reduce exposure and chroma before adding blue.

Starting points

  • Start with −1 to −2.5 stops on land for day-for-night and a soft sky gradient window.
  • Keep the horizon glow as the brightest non-practical area.

Watch

  • Blue pushed into the toe turns black into navy and exposes noise.
  • Silhouettes merging into land when the toe is crushed.
Clip · optionalN11

Texture, grain and bloom

Match grain, halation and bloom so graded highlights and practicals keep the photographic texture of film origination.

Do this

  • Add or match grain after all density moves, at a size appropriate to the delivery.
  • Use restrained glow only where the reference shows bloom around sources.
  • Bypass by default; enable per shot.

Starting points

  • Start with grain at low strength and check at 100% on dark and bright areas.
  • Keep glow thresholds high so only sources bloom.

Watch

  • Digital-clean shadows beside grainy highlights after heavy noise reduction.
  • Glow that softens faces or reduces midtone contrast.
VFX / Clip · parallelN12

VFX and flash integration

Integrate muzzle flashes, sky work and any environment elements with matched black level, grain, bloom and light spill.

Do this

  • Grade plates and elements to match before combining; add spill onto nearby surfaces from the element's colour.
  • Match bloom and grain across element edges.
  • Keep single-frame and two-frame events consistent with adjacent frames.

Starting points

  • Start with element black at or slightly above the plate's toe.
  • Review at speed and frame by frame.

Watch

  • A flash element brighter than any plate highlight with no spill on the subject.
  • Mismatched grain inside the element.
Group Post-ClipN13

Output transform and trim

Render the scene-referred grade to the calibrated delivery while keeping display-specific trims out of the shared look.

Do this

  • Use Resolve Colour Management or a CST from DWG/Intermediate to the required gamut and transfer.
  • Enable suitable tone and gamut mapping, then inspect skies, black costume and cyan practicals for compression.
  • Create separate SDR, HDR or alternate-display trims rather than changing the scene-referred graph.

Starting points

  • For comparison with the reference PNGs, monitor Rec.709 gamma 2.4 in a controlled surround.
  • Use soft clip only as a final guard.

Watch

  • A double output transform shifts both desert warmth and black placement.
  • Banding in overcast skies, dusk gradients and flash blooms in the encoded deliverable.
8 reconstruction studies

Read the image first; use the scopes to test the read

Each study begins with a literal visible description and tests it against the active-picture measurements of the verified midpoint. Metrics describe the whole frame and cannot identify rock, blood, coat or tube without the visual inspection recorded in the prose; the scene-report numbers quoted in four studies come from reviewed regions over whole shots and are labelled as such.

Build the base with every optional node bypassed. Add only the named shot operations, check keys and windows at full resolution, and inspect moving footage before approving qualifiers, tracked windows, glow or flash integration.

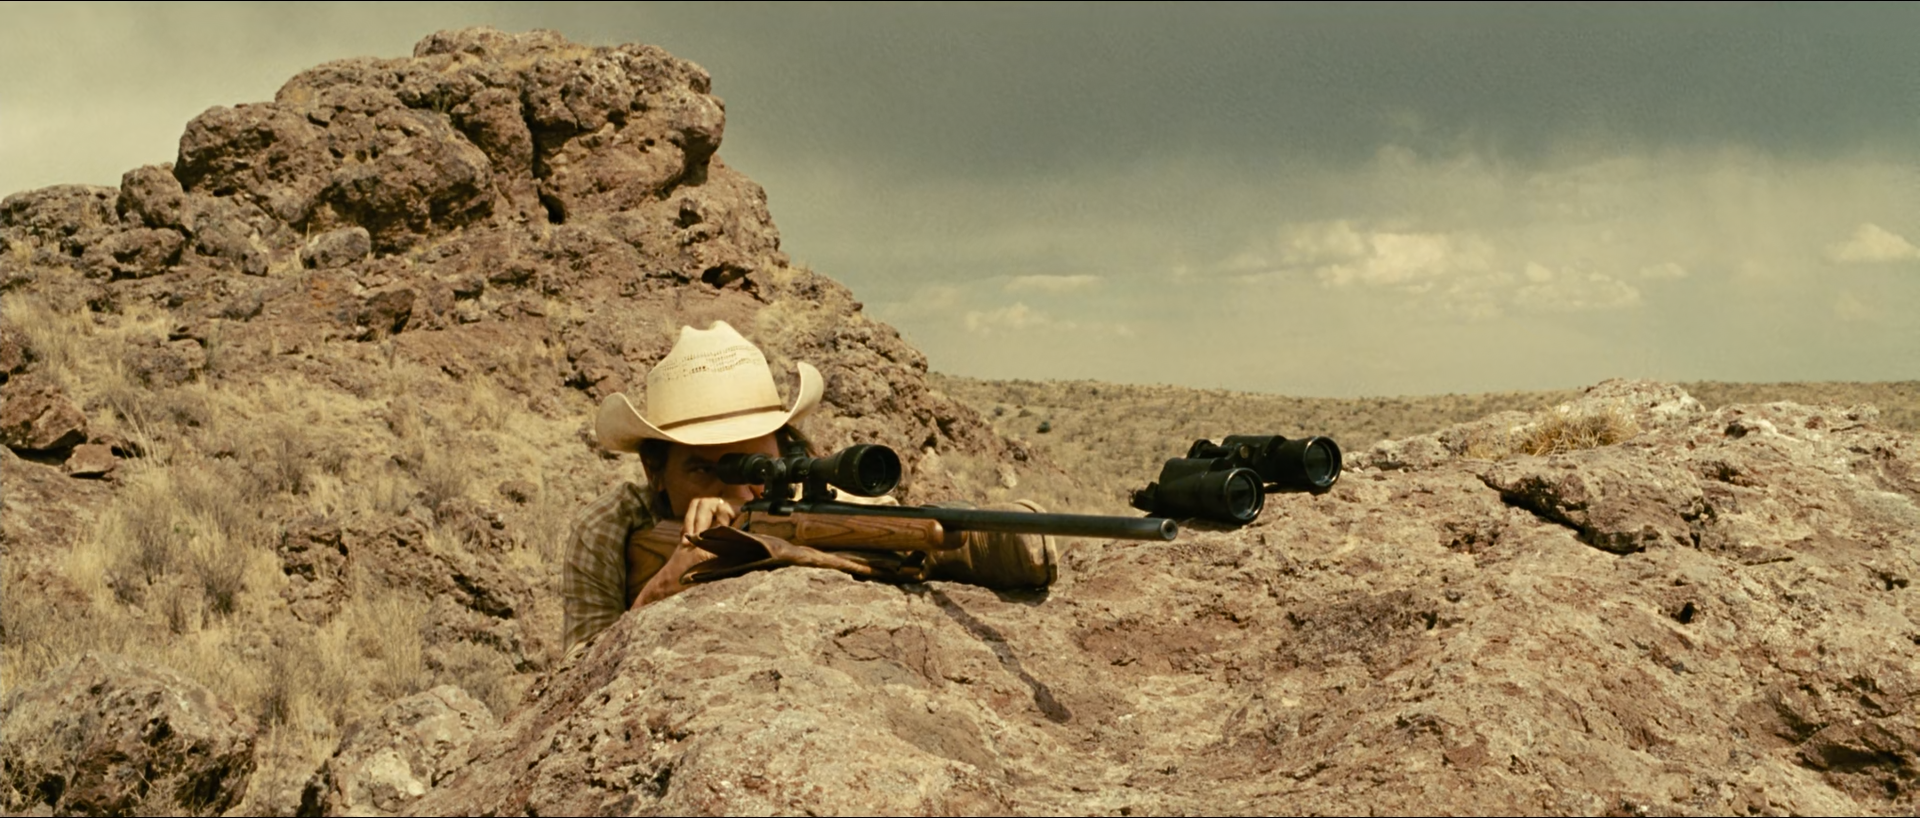
01 · Scene study I · The Morning in the Desert · shot 55 · 01:05:37:10

A white hat low in ochre rock

Moss lies behind a rim of pinkish-ochre lava rock aiming a scoped rifle, a pair of binoculars on the rock beside him, under a heavy grey-green sky that fills the upper third.

Regular-footage feasibility: High Composite/VFX read: low
A man in a pale cowboy hat and plaid shirt lies behind ochre volcanic rock aiming a scoped rifle, with binoculars beside him and an overcast grey sky above a flat desert horizon.
The white hat is the brightest object; rock, dry grass and overcast sky share one warm family and separate mainly by value.

What is remarkable

Almost nothing in this frame is dark or saturated. Only 6% of the active picture falls in the shadow zone and 25% in highlights, and mean chroma is about 25 C* with warm balance near 1.0: the whole frame lies on the warm side. The white hat is the brightest object and the one hard edge that locates the figure; his face is a small darker patch under the brim, and the rifle and binoculars supply the only near-blacks.

The desert scene's report measured this setting over the four ridge shots: the rock renders L* about 55 at b* +28, the sky L* about 60 at b* +15 to +19. Sky and ground are nearly the same lightness and both yellow. What keeps the horizon readable is texture and a slight green-grey in the sky, not a blue sky against orange rock. In this shot Moss's face region measures L* about 16 to 18, darker than rock and sky by a wide margin: the hat, not the face, carries the figure.

Where the image comes from

Overcast sky, real lava rock, wardrobe (pale hat, faded plaid) and a low camera placement produce the image. The grade can compress the warm family, set the hat just below clipping and keep the sky's slight grey-green distinct from the rock, but it cannot create rock texture or a sky gradient the capture does not hold.

Set exposure for the hat and sky first, then place the rock in the midtones. Separate sky from rock with a soft horizon window rather than a hue push, and leave the face dark under the brim: lifting it would put it in competition with the hat.

Waveform

RGB distribution

Vectorscope

Can regular footage get there?

High

Log or raw exterior footage under a similar overcast sky reaches this frame with ordinary contrast and palette work.

Minimum capture conditions

  • Overcast or bright diffuse sky exposed with texture.
  • Pale hat and warm rock with detail near the top of the range.
  • A low, stable composition with the figure against rock rather than sky.

Composite and background read

Practical location capture is the plausible read

Contact shadows under the rifle and binoculars, rock occlusion and haze at the horizon are coherent with one plate. A sky enhancement is possible in any desert exterior but nothing here requires it.

A still cannot rule out sky replacement or cleanup; only plates or production records could.

Shot-specific Resolve pass

Use the global tree, then make these decisions

N03

Place the hat below white

Shape a rolled shoulder so the hat and the brightest cloud keep texture, with the hat as the top of the image.

Why: The hat is the frame's locator; clipping it flattens the figure.

Watch: Do not pull the sky darker than the rock to compensate.

N04

Hold one warm family

Narrow hue spread around yellow-orange and pull grass greens slightly toward the rock family.

Why: Rock, grass and sky separate by value here, not hue.

Watch: Keep the sky's slight grey-green; a beige sky merges with the rock.

N06

Separate the sky with a window

Use a soft horizon gradient to hold sky density and texture independently of the rock.

Why: A hue key cannot separate two yellow surfaces reliably.

Watch: Watch the horizon line for a visible gradient edge on the rock rim.

N08

Keep the face under the brim

Lift the face window by no more than 0.1 stop, only enough to read the eye at the scope.

Why: The shadowed face keeps attention on the hat and rifle line.

Watch: A brighter face competes with the hat and reads as fill light.

Failure modes to check before approval

  • Sky and rock converging to one beige field after palette compression.
  • The hat clipping in the brightest frames of the shot.
  • A horizon gradient window visible as a band across the rock rim.
  • Green cast in grass after lifting midtones.

02 · Scene study II · The Morning in the Desert · shot 89 · 01:08:51:05

Dried blood on a cream seat

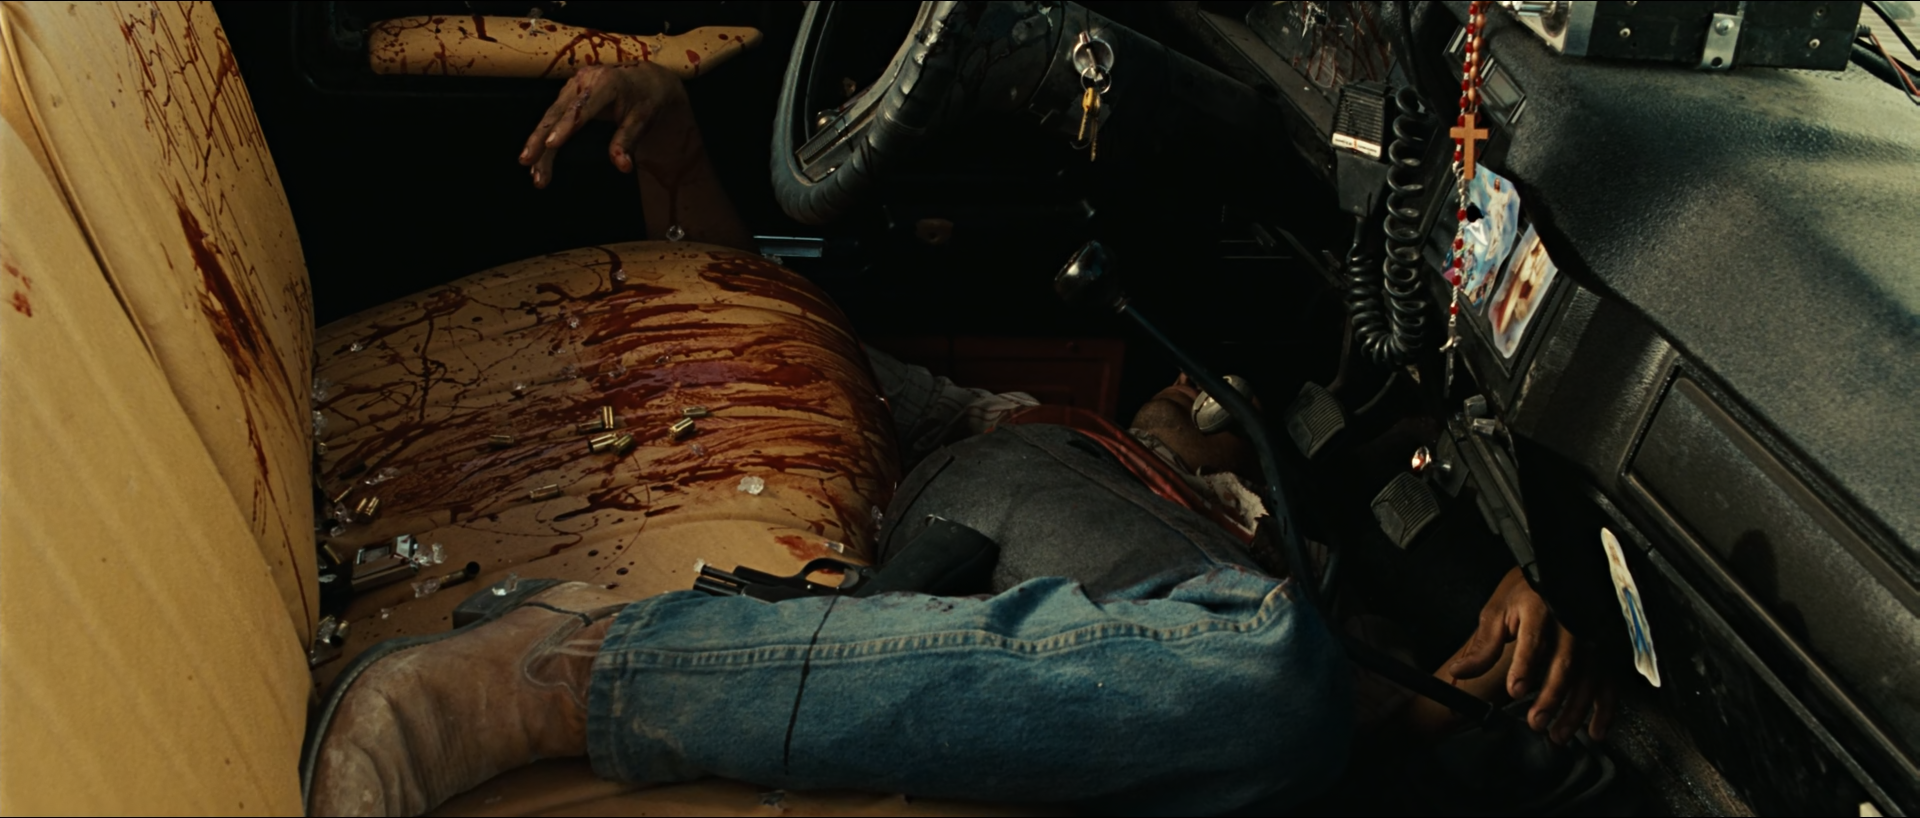
A dead man lies across the cab of a pickup, his head down near the pedals; blood streaks the cream vinyl seat and door, spent casings lie on it, and a rosary and pictures hang from the dark dashboard.

Regular-footage feasibility: High Composite/VFX read: low
Inside a pickup cab, a man's body in a bloodied shirt and blue jeans lies across a cream vinyl seat streaked with dark red blood and scattered brass casings, beside a black dashboard hung with a rosary.
Cream vinyl and dark red blood carry the frame's colour; black dashboard and footwell hold nearly half the picture in deep shadow.

What is remarkable

The frame is split between a lit cream-and-red seat on the left and an almost black dashboard and footwell on the right. Mean L* is about 16 with 68% of the picture in shadow and 46% in deep shadow, yet the blood reads as dried and brown-red rather than bright: high-chroma pixels are only 8% of the frame. Brass casings, a key ring and the rosary beads are small bright points in the dark.

The desert scene's report treats this insert as a whole-frame shot only; no regions were tracked in it. Its whole-frame median over the shot is L* about 7, darker than any setting's frame in that scene. It arrives among the scene's brightest exteriors, the trucks at L* 76 ground and L* 89 sky, so the cut into the cab is a drop of several stops that the grade must keep rather than smooth.

Where the image comes from

Art department blood, cream vinyl, the dashboard dressing and an exposure that lets the cab go dark supply the image. The grade holds blood hue away from bright red, protects the cream seat from turning yellow, and keeps the dashboard dense but with shape in its texture.

Place exposure for the seat and the casings. Build the dark side in the toe, not by crushing, and key the blood separately so palette compression does not drag it toward the cream.

Waveform

RGB distribution

Vectorscope

Can regular footage get there?

High

A practical interior insert with dressed blood and controlled exposure reaches this frame with contrast and a small qualifier for blood.

Minimum capture conditions

  • Blood dressing with dried, dark red-brown colour on set.
  • Exposure that holds cream vinyl texture with the dashboard far below it.
  • A clean toe for the black dashboard without chromatic noise.

Composite and background read

A practical dressed insert is the plausible read

Blood sits in the vinyl grain and folds, casings cast small shadows, and the light falloff across the cab is continuous. Digital blood enhancement is common in such inserts, but the still shows no edge or texture mismatch.

Blood enhancement or cleanup cannot be excluded from a still.

Shot-specific Resolve pass

Use the global tree, then make these decisions

N03

Build the cab's dark half in the toe

Shape the toe so the dashboard and footwell go deep but keep vinyl texture and the rosary highlights.

Why: The drop from the bright exterior depends on real density, not crushed black.

Watch: Do not lift the toe to see into the footwell.

N05

Protect dried blood

Key blood with a narrow red-brown qualifier intersected with a seat window; keep its hue away from bright red and its saturation below the cream seat's lightness contrast.

Why: Dried blood reads through darkness and value, not saturation.

Watch: The key must not catch the cream seat's warm folds.

N04

Keep the cream seat cream

Pull yellow saturation slightly on the seat and door so they stay near-neutral warm.

Why: A yellow seat makes the blood look orange.

Watch: Watch the jeans: denim should keep its blue.

N09

Clean chroma in the black dashboard

Reduce saturation below about 8% luma.

Why: Coloured noise in a black dashboard reads as video, not film.

Watch: Keep the rosary's red and the pictures' colour above the threshold.

Failure modes to check before approval

  • Blood shifting toward bright red after contrast.
  • The cream seat turning yellow under palette warmth.
  • Chromatic noise in the dashboard and footwell.
  • Casings and key ring clipping as the shoulder tightens.

03 · Night study · blue sky, amber lights · shot 208 · 01:18:58:04

A runner against amber headlights

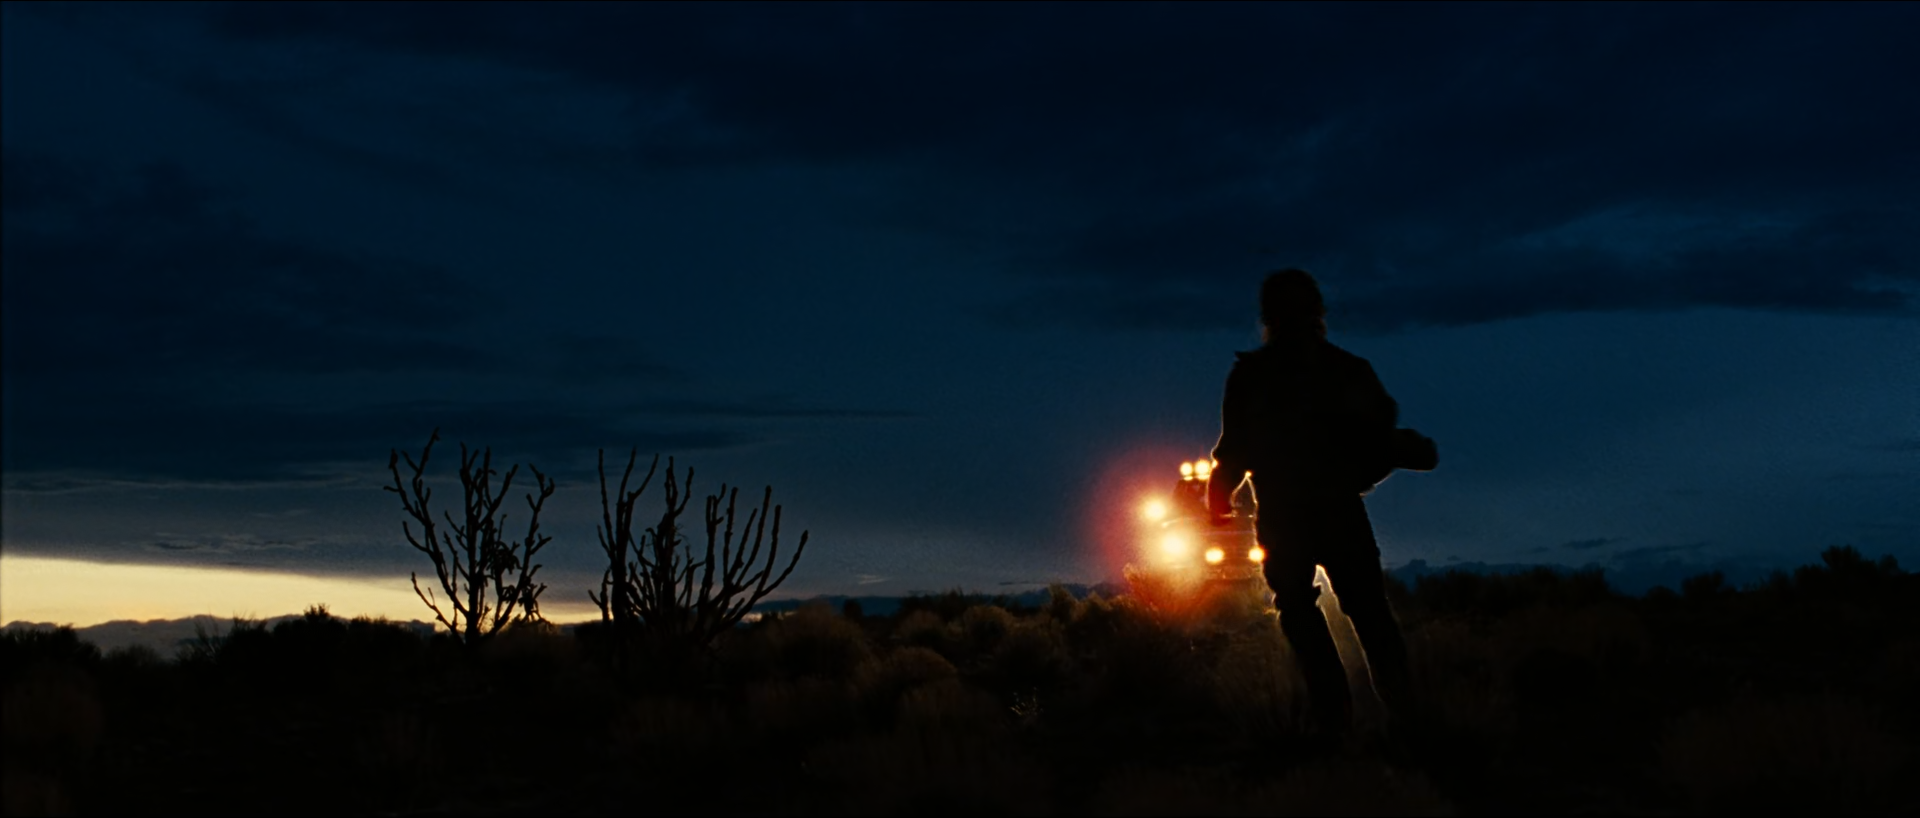
A dark silhouette of a man runs across low desert scrub at dusk; behind him a cluster of amber headlights and roof lights glows over a black horizon, under a deep blue cloud-streaked sky with a thin warm band at the left.

Regular-footage feasibility: Conditional Composite/VFX read: medium
At dusk in open desert, a silhouetted man carrying something runs across dark scrub while a vehicle's amber headlights glow behind him under a deep blue cloudy sky with a faint orange band on the horizon.
Almost everything is in deep shadow; the only warmth is the headlight cluster and a thin horizon band under a blue sky.

What is remarkable

Mean L* is about 5 and 96% of the active picture is in the shadow zone, yet the frame is legible: the sky is a dark blue field with cloud texture, the land and scrub are near black, and the man's silhouette separates from both by edge rather than exposure. The headlights and roof lights are the brightest objects, with a red-orange bloom around them; the thin warm band at the left horizon echoes their hue at a much lower level.

Chroma is concentrated in two places: blue in the sky (mean b* about −5.7) and amber at the lights. The land holds almost no colour. That split is what separates a night-blue look from a blue-tinted image: the toe is close to neutral black, and blue lives only in the sky and upper mids.

Where the image comes from

A late-dusk exposure with real sky gradient, practical headlights on the vehicle and a performer against the sky produce the silhouette. The grade darkens and cools the sky field, keeps the land neutral-black, and protects the headlight warmth and bloom; it cannot create sky texture or a clean silhouette edge from a noisy capture.

If the material was shot in brighter dusk, bring exposure down first, reduce chroma, then introduce blue into the sky with a gradient window. Keep the practicals' own colour out of the blue move.

Waveform

RGB distribution

Vectorscope

Can regular footage get there?

Conditional

Achievable from true late-dusk footage with sky texture and practical headlights. Day-for-night material without a real sky gradient or practical lights cannot supply the bloom or the horizon band convincingly.

Minimum capture conditions

  • A real dusk sky with cloud detail recorded above the noise floor.
  • Practical headlights on set producing their own bloom.
  • Enough latitude to hold the silhouette edge against the sky without lifting the land.

Composite and background read

Sky enhancement or a combined dusk plate is plausible

The sky's rich cloud texture at such a low exposure, the clean silhouette edge and the horizon band are all achievable in camera at the right minute, but the combination is also a common target for sky work or plate combination in night-exterior sequences.

Only moving footage, plates or production records could establish whether the sky, lights or silhouette were combined.

Shot-specific Resolve pass

Use the global tree, then make these decisions

N10

Build blue in the sky, not the toe

Use a sky gradient window to carry blue and cloud density; keep the land and silhouette toe near neutral.

Why: Blue in the toe turns black into navy and exposes noise.

Watch: The horizon band must stay warm under the blue move.

N07

Protect the headlights

Key the light cluster and its bloom; hold an amber core and reduce only the outer bloom's density if needed.

Why: The practicals are the frame's only warm event and its focal point.

Watch: A hard key on the bloom edge produces rings.

N03

Keep the silhouette above the land

Shape the toe so the runner's outline sits a small step above scrub and below the sky.

Why: Legibility comes from edge separation at very low exposure.

Watch: Crushing the toe merges the man into the land.

N11

Match grain in the dark field

Enable matched grain after density moves and check it in sky and land.

Why: Clean dark areas beside grainy lights read as processed.

Watch: Grain too coarse in the sky gradient bands on delivery.

Failure modes to check before approval

  • Navy-coloured blacks in the land.
  • Headlight bloom rings or steps.
  • Silhouette merging into scrub.
  • Banding in the dark sky gradient on the encoded deliverable.

04 · Scene study III · The Confrontation at the Counter · shot 267 · 01:20:52:05

A red Texaco sign over a pale plain

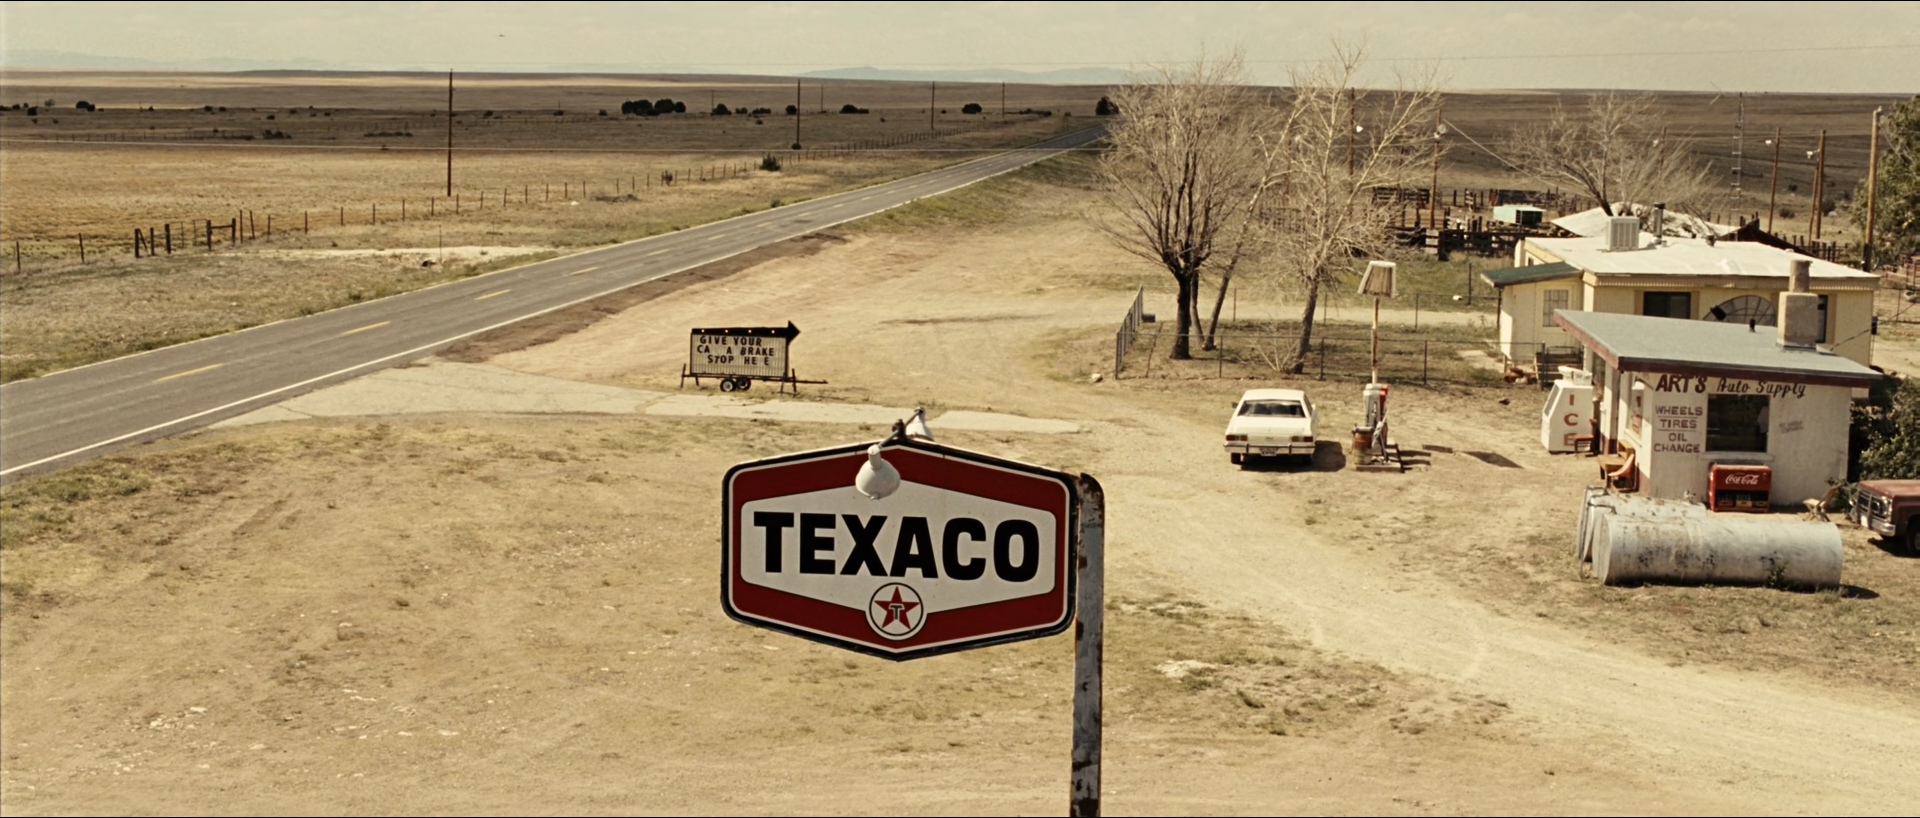
From above, a red-and-white Texaco sign hangs in the foreground over a beige dirt forecourt; a two-lane road curves away at left, and a small filling station, a white car, a propane tank and bare trees sit under a pale, washed-out horizon.

Regular-footage feasibility: High Composite/VFX read: low
An elevated view of a desert filling station: a red and white Texaco sign in the foreground, a beige dirt lot, a two-lane road, a white car, low buildings and bare trees under a pale sky.
A wide, pale, low-contrast desert field with one saturated red accent in the sign; nearly half the frame is in the highlight zone.

What is remarkable

This frame is bright and flat. Mean L* is about 59 with 49% of the picture in the highlight zone and only 5% in shadow, and the palette is a narrow range of beige, tan and pale ochre. The road, dirt, dry grass and pale sky share the warm family. Against it the sign's red panel is the only saturated colour in a frame whose high-chroma fraction rounds to zero: it is a small area, not a loud one.

The confrontation report's film layer places this whole scene in the largest look family of the film, named restrained open warm-neutral by the repository's temporal analysis, and its first shot is this one. The confrontation's measured surround behind the proprietor later renders L* 78 to 82 at b* +15 to +22, a window onto this same kind of pale warm exterior.

Where the image comes from

Location, time of day, a high camera and the production-dressed sign and station supply the image. The grade holds a lifted, pale highlight field without clipping the sky, keeps the family warm-neutral rather than yellow, and protects the sign's red and white. It cannot add the atmospheric haze or the station's weathering.

Expose for the sky and brightest dirt, let midtone contrast stay low, and key the sign separately so the red is not compressed into the family.

Waveform

RGB distribution

Vectorscope

Can regular footage get there?

High

A daylight exterior with a real sign and bright diffuse sky reaches this frame with a soft shoulder, restrained contrast and a small red qualifier.

Minimum capture conditions

  • Bright diffuse daylight with sky and dirt exposed below clipping.
  • A dressed, weathered sign with real red paint in the foreground.
  • Atmospheric haze or distance that softens the far horizon.

Composite and background read

Location capture with possible cleanup is the plausible read

The sign's contact with its pole, the shadows under the car and tank and the haze toward the horizon are coherent. Removal of modern details or sign cleanup is common in period locations and cannot be ruled out, but no edge suggests it.

Period cleanup or set dressing extension cannot be established from a still.

Shot-specific Resolve pass

Use the global tree, then make these decisions

N03

Hold a high, soft shoulder

Roll off the sky and pale dirt so nearly half the frame sits high without clipping.

Why: The pale field is the look; clipping it removes the haze and horizon.

Watch: Do not lower the whole image to protect the sky.

N04

Warm-neutral, not yellow

Narrow hue spread and reduce yellow saturation slightly across dirt and grass.

Why: The family is warm-neutral; yellow dirt reads as a filter.

Watch: Keep a visible difference between road asphalt and dirt.

N05

Protect the red sign

Key the sign's red panel; keep its hue and saturation out of N04's compression and avoid adding more.

Why: The accent works because the field around it is restrained.

Watch: The key must not pick up the car's warm tail lights or the soda machine.

N09

Clean highlight chroma

Reduce saturation above about 90% luma so sky and pale dirt do not shift hue.

Why: A strong shoulder can push pale sky toward cyan or yellow.

Watch: Check the white car and tank stay neutral.

Failure modes to check before approval

  • Yellow cast across the dirt after warmth is added.
  • Clipped sky or pale dirt removing the haze.
  • The red sign over-saturating and vibrating on delivery.
  • Loss of separation between the road and the lot.

05 · Scene study IV · The Confrontation at the Counter · shot 293 · 01:22:41:00

A black coat against a pale store

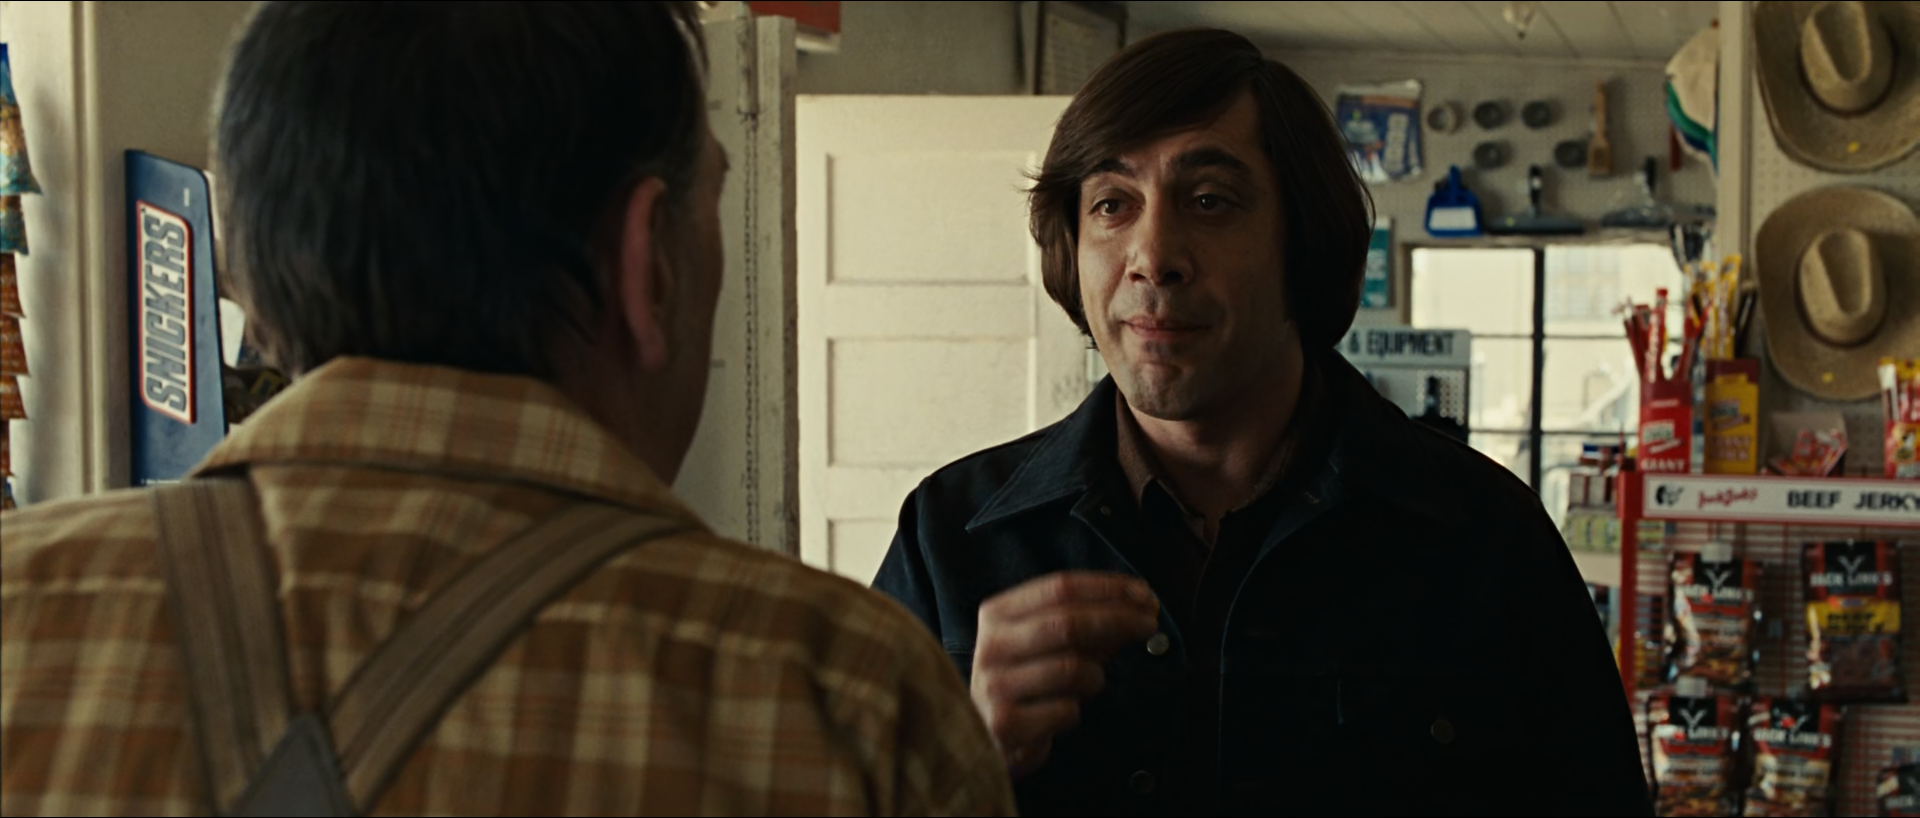
Over the proprietor's plaid shoulder in the foreground, Chigurh stands in a black jacket at the counter, lit from the side, with a white door, pegboard of goods, straw hats and a snack rack behind him.

Regular-footage feasibility: Conditional Composite/VFX read: none
Inside a small store, a man with a dark bowl haircut and black jacket stands behind a counter facing an older man seen from behind in a plaid shirt and suspenders, with a white door, hats and snacks in the background.
A dense black coat and dark hair sit against a pale, cluttered interior; a plaid shoulder fills the left foreground.

What is remarkable

The frame's weight is dark: mean L* about 23 with 58% in shadow and 32% in deep shadow, most of it the black jacket, hair and the plaid shoulder in the foreground. Against that, the white door, pale wall and the lit counter merchandise hold the upper range, and a small window at right is the brightest area. The jacket keeps collar and seam shapes despite its density.

The confrontation report measured this shot's regions. Chigurh's coat renders about L* 0.2 and his hair about 0.5, his face about L* 5.6 at a* +5, b* +6; the door behind him L* 77 and the store background around him L* 44 at b* +16. Across that scene the landmark cheek patches on his face differ by 4.5 to 5.9 stops, lit on the image-left side toward the proprietor: a hard side light the grade must keep. Over the shoulder a dark foreground figure fills about a third of his shots, which is why their whole-frame level says little about his face.

Where the image comes from

Wardrobe (a true black jacket), hair, a hard side key, the pale set and a practical window supply the construction. The grade holds the coat just above black, keeps the face's shadow side dark, and lets the pale set stay pale without competing with the face. It cannot create the side light's modelling or recover coat detail that was underexposed.

Place exposure on the lit cheek and the white door, shape the toe for the coat, and use a soft face window only for the eyes. Keep the plaid shoulder dark so it frames rather than competes.

Waveform

RGB distribution

Vectorscope

Can regular footage get there?

Conditional

Achievable when the capture holds black-coat texture and a hard side key on the face with the pale interior below clipping. Flat or front-lit material cannot be graded into this split.

Minimum capture conditions

  • A hard, directional key leaving one cheek several stops below the other.
  • Black costume exposed with seam and collar detail above the noise floor.
  • A pale set and window held below clipping in the same exposure.

Composite and background read

No visible reason to invoke compositing

A dressed practical interior, consistent focus falloff and shared light across the figures and set.

Invisible cleanup is not ruled out.

Shot-specific Resolve pass

Use the global tree, then make these decisions

N03

Coat above black

Shape the toe so the jacket sits a small step above the deepest gaps and keeps collar and seams.

Why: Crushed black costume reads as a cut-out against the pale set.

Watch: Watch chroma noise in the coat as the toe is shaped.

N08

Keep the side light on the face

Use a soft face window to lift the eyes by about 0.1–0.2 stop on the lit side only; leave the shadow cheek.

Why: The scene's measured faces carry several stops between cheeks; filling it removes the menace and the modelling.

Watch: Window drift as he moves his head.

N06

Hold the white door and window

Key the door and window with a soft luminance qualifier and roll them just below the face's importance.

Why: The pale set frames the dark figure but must not pull the eye.

Watch: Halo along the hair edge against the white door.

N05

Keep plaid and skin apart

Protect skin hue in a narrow qualifier and hold the foreground plaid dark and slightly desaturated.

Why: The shoulder frames the shot; a bright plaid competes with the face.

Watch: The skin key must not catch the warm goods on the rack.

Failure modes to check before approval

  • Filled shadow cheek making the face flat.
  • Coat detail lost in a crushed toe.
  • White door clipping and blooming around the hair.
  • Foreground plaid brightening and pulling attention.

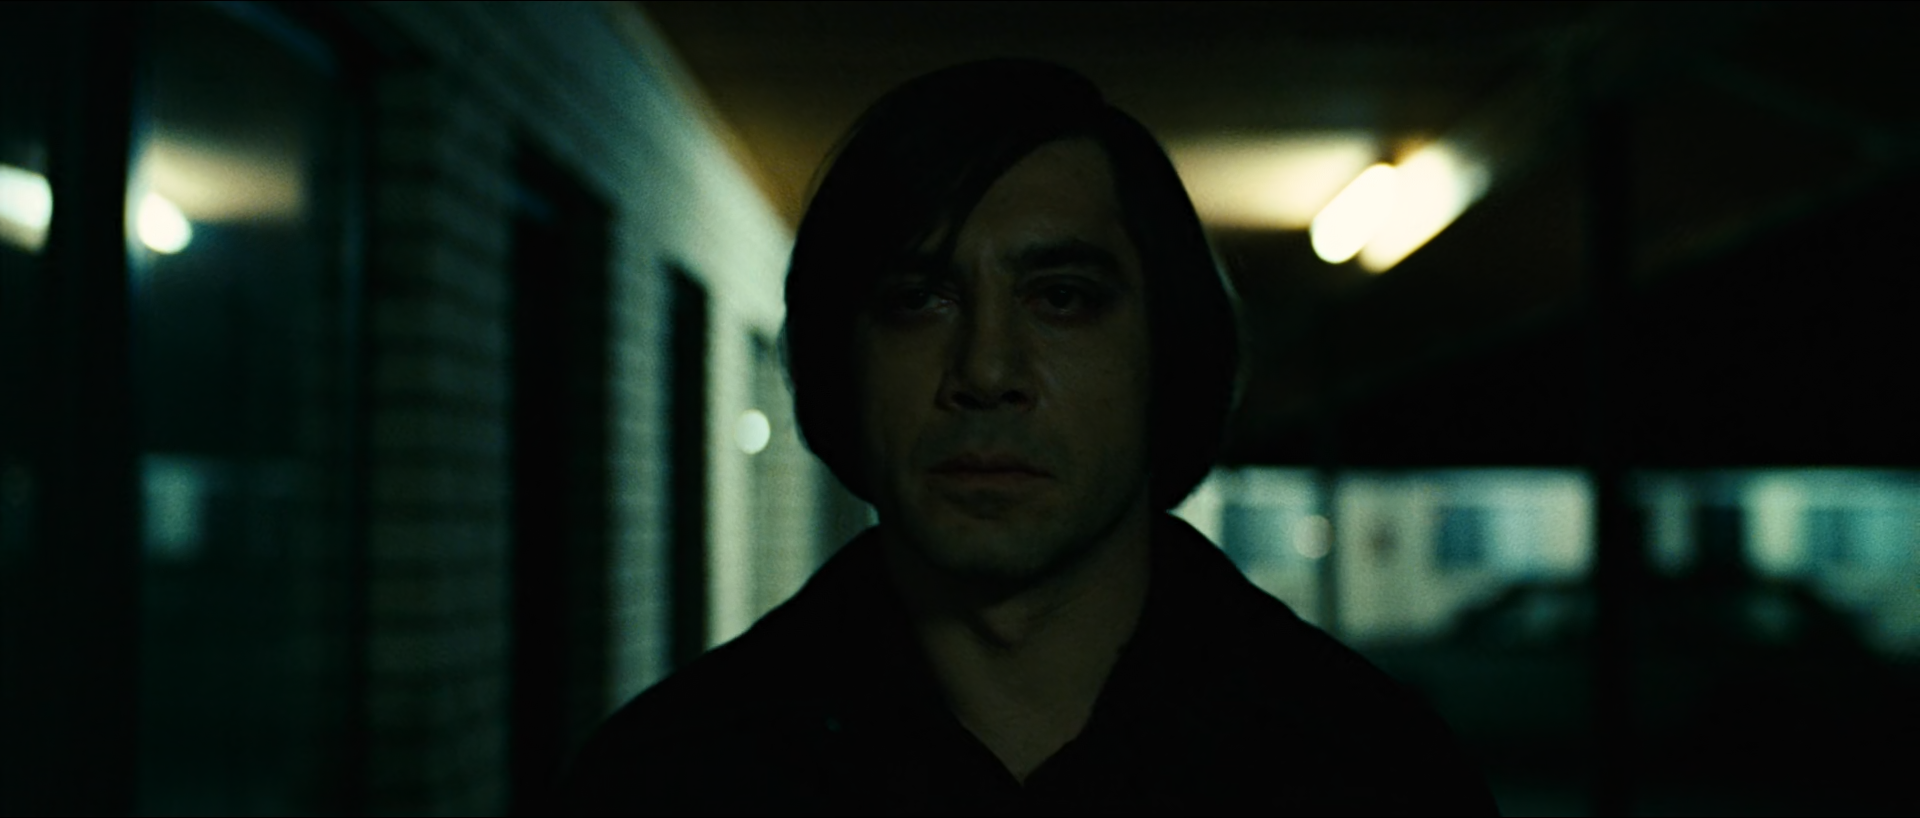
06 · Narrow-spectrum study · a motel corridor · shot 585 · 01:49:14:13

A face under cyan fluorescents

Chigurh walks toward camera down a dark motel walkway at night; out-of-focus fluorescent tubes glow pale green-white overhead and behind him, and brick walls and doorways fall off into green-black shadow.

Regular-footage feasibility: Conditional Composite/VFX read: none
A man with a dark bowl haircut and black jacket walks toward the camera along a dim motel corridor at night, lit by soft green-white fluorescent tubes behind him and brick walls in dark green shadow.
A green-cyan cast fills walls and shadows; the face is dim and sallow, and the tubes are the brightest points.

What is remarkable

Mean L* is only about 8, with 87% in shadow and 80% in deep shadow, and mean a* is negative (about −3.6): the frame leans green where most of the film leans warm. Chroma is low overall (about 4.7 C*) but consistent in direction, so the cast reads as the light of the place rather than a tint. The fluorescent tubes are soft, pale and greenish, not white.

The face sits well below the tubes, sallow and slightly green on its shadow side, with modelling from light behind and above. The walls and far doorways are separated by faint green-cyan values; the jacket and hair merge into the dark except where a rim catches them.

Where the image comes from

Practical fluorescent fixtures, a night exterior walkway and low exposure provide the construction. The grade keeps the cyan-green cast in walls and shadows, holds the face slightly less green than its surroundings, and protects the tubes from clipping to pure white. It cannot create a narrow-spectrum light's colour on a set lit with full-spectrum sources.

Place exposure on the face, keep the cast in the environment branch, and use a skin qualifier to take a few degrees of green out of the face without warming it.

Waveform

RGB distribution

Vectorscope

Can regular footage get there?

Conditional

Achievable with real fluorescent or green-cyan practicals and enough exposure on the face. A neutral set graded green reads as a filter, and very low log exposure breaks into green noise.

Minimum capture conditions

  • Practical fluorescent or matched narrow-spectrum fixtures on set.
  • Face exposure above the noise floor at night.
  • Soft, out-of-focus tubes that bloom without clipping.

Composite and background read

No visible reason to invoke compositing

Out-of-focus practicals, walls and figure share one depth of field and light direction.

Invisible cleanup is not ruled out.

Shot-specific Resolve pass

Use the global tree, then make these decisions

N07

Keep the fluorescent cast

Key walls and shadows and hold their green-cyan; take no more than a few degrees of green out of the practical key.

Why: Neutralizing the cast removes the place.

Watch: Tubes turning pure white after a shoulder.

N05

Pull green out of the face, not warmth in

Soft skin qualifier intersected with a face window; rotate hue 3–6° away from green and hold density.

Why: A warm face looks lit by a different source.

Watch: The key catching green walls behind the hair.

N03

Deep toe without noise

Shape a deep toe for jacket and hair; keep a small step on the rim edges.

Why: The figure should emerge only where light touches it.

Watch: Green chroma noise in the toe.

N09

Desaturate the deepest shadows

Reduce saturation below about 6% luma.

Why: Coloured blacks make the cast look added.

Watch: Keep the green in the lower mids where the walls read.

Failure modes to check before approval

  • Green chroma noise in the jacket and far shadows.
  • A warmed face that no longer belongs to its light.
  • Clipped, pure-white tubes.
  • The cast drifting between cuts in the sequence.

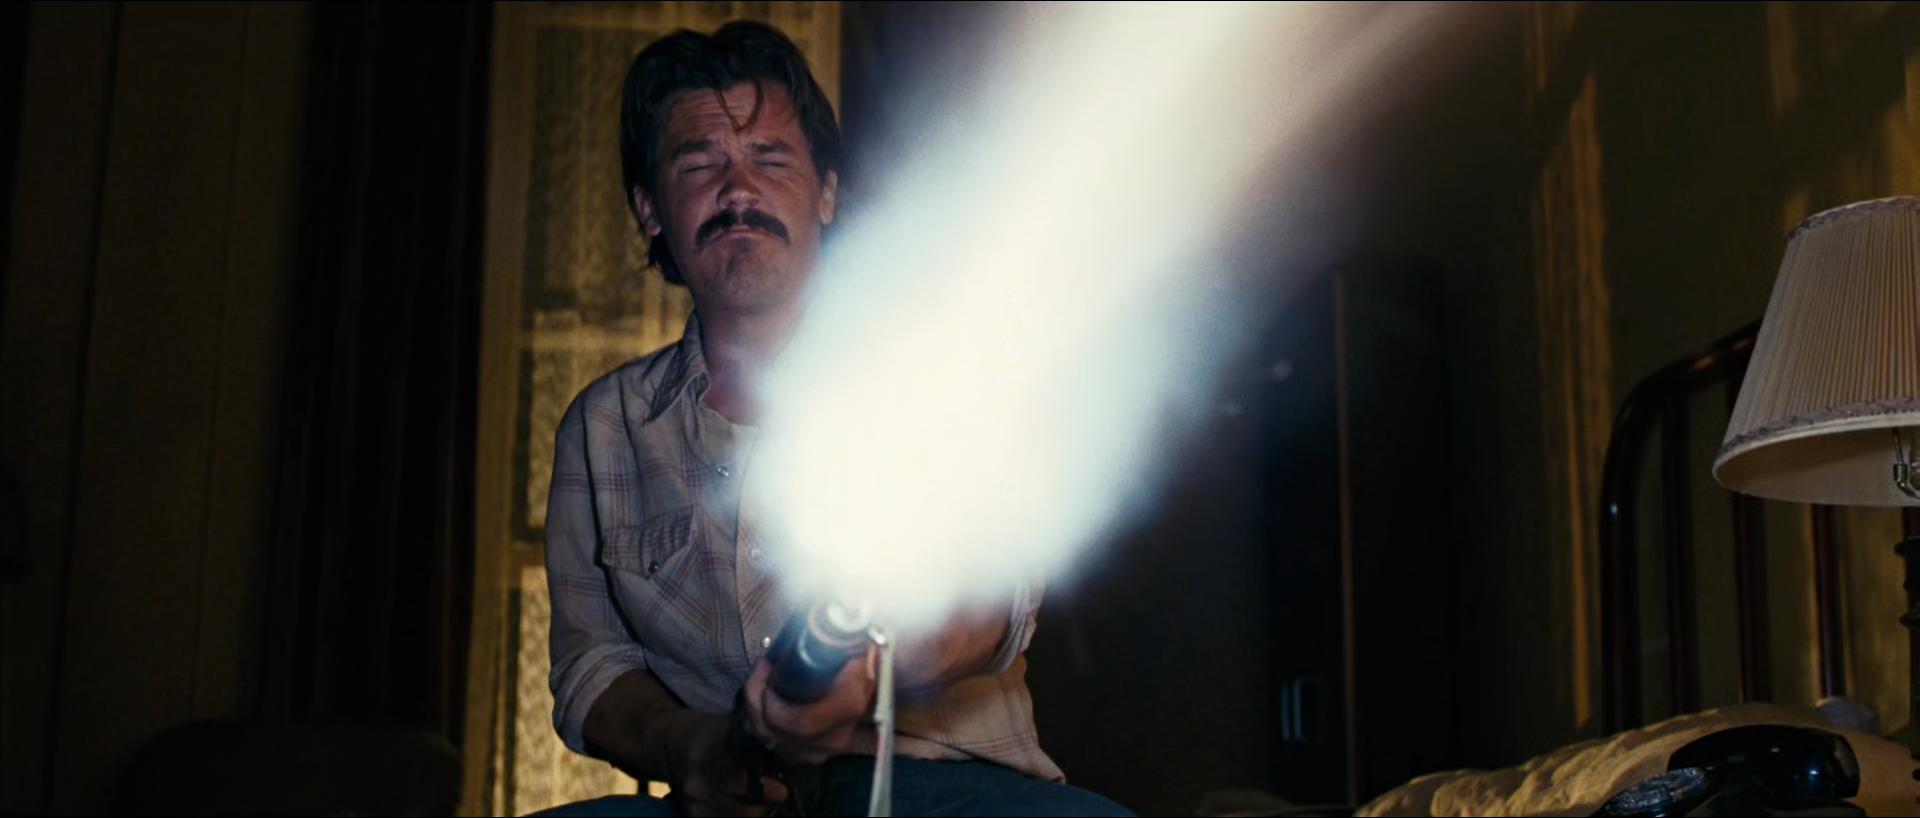
07 · Flash study · two frames of light · shot 727 · 02:00:42:21

A white blast inside a brown room

Moss sits on the edge of a motel bed with his eyes closed tight, a long weapon in his hands pointed toward the camera; a broad white-blue bloom bursts from its muzzle across the dark brown room, with a lamp and bedframe at right.

Regular-footage feasibility: Low Composite/VFX read: medium
In a dim brown motel room, a man with a moustache squints with eyes shut as a broad bright white-blue burst of light extends diagonally from the weapon he holds, with a table lamp and bedframe beside him.
A two-frame corpus shot: the burst is the brightest area by far, and the room around it stays deep brown and near black.

What is remarkable

The frame has the widest tonal spread among these studies (σ L* about 31): 71% in shadow, 56% in deep shadow and 14% in highlights, almost all of the highlights in the burst. The burst is cool, white-blue at its core and softening into the brown room with a broad, directional falloff; Moss's face and shirt catch spill on the side toward it. Mean chroma is low (about 5.6 C*), because the room is dark and the burst is nearly white.

The corpus records this shot as 0.08 seconds, two frames at 24 frames a second. That is compatible with a gunshot flash cut as its own shot, and it means the grade's decisions are about a light event rather than a held image. Only this midpoint was inspected; the adjacent frames were not.

Where the image comes from

A dark practical interior, the performer's reaction and either a practical flash, an interactive light cue or a composited muzzle element supply the event. The grade holds the room's brown density, lets the burst bloom without clipping into a flat shape, and keeps spill on the face consistent with the burst's colour.

Treat the burst and its spill as one element: match its colour on the face and shirt, keep grain inside it, and check the two frames against the shots either side at speed.

Waveform

RGB distribution

Vectorscope

Can regular footage get there?

Low

A useful reference for a flash event rather than a generally reproducible grade. The burst's shape, bloom and spill come from capture or VFX; graded footage without them cannot produce this frame.

Minimum capture conditions

  • A practical flash, interactive light or a matched muzzle element with its own spill.
  • A dark interior exposed to hold brown density beside a near-white burst.
  • Frame-accurate review of the event with its neighbouring shots.

Composite and background read

A composited or augmented flash is plausible

Muzzle flashes are commonly augmented or added in post, and the burst's soft, broad form against a crisp room is compatible with an element. The spill on the face and shirt is also consistent with a practical or interactive light cue.

Only moving footage, plates or production records could establish how the flash was made.

Shot-specific Resolve pass

Use the global tree, then make these decisions

N12

Integrate the burst with its spill

Grade the burst element and its spill on face and shirt as one colour; keep grain and bloom continuous across its edge.

Why: A flash without matching spill reads as pasted on.

Watch: Mismatched grain inside the bloom.

N03

Bloom, not a flat shape

Roll the burst's core with a soft shoulder so its gradient survives on delivery.

Why: A hard clip turns the burst into a solid white shape.

Watch: Banding in the falloff on 8-bit delivery.

N08

Hold the room dark

Keep the room and bed in the toe with a large soft window; do not lift to show the room.

Why: The event reads through contrast with a dark space.

Watch: The lamp shade should keep its shape, not blow.

N11

Match texture across two frames

Enable matched grain and restrained glow, and compare against the adjacent frames at speed.

Why: Two frames must feel like part of the sequence.

Watch: Glow softening the face.

Failure modes to check before approval

  • A burst clipped to a flat white shape.
  • Spill on the face with a different colour from the burst.
  • Banding in the bloom's falloff.
  • The two frames jumping in black level against their neighbours.

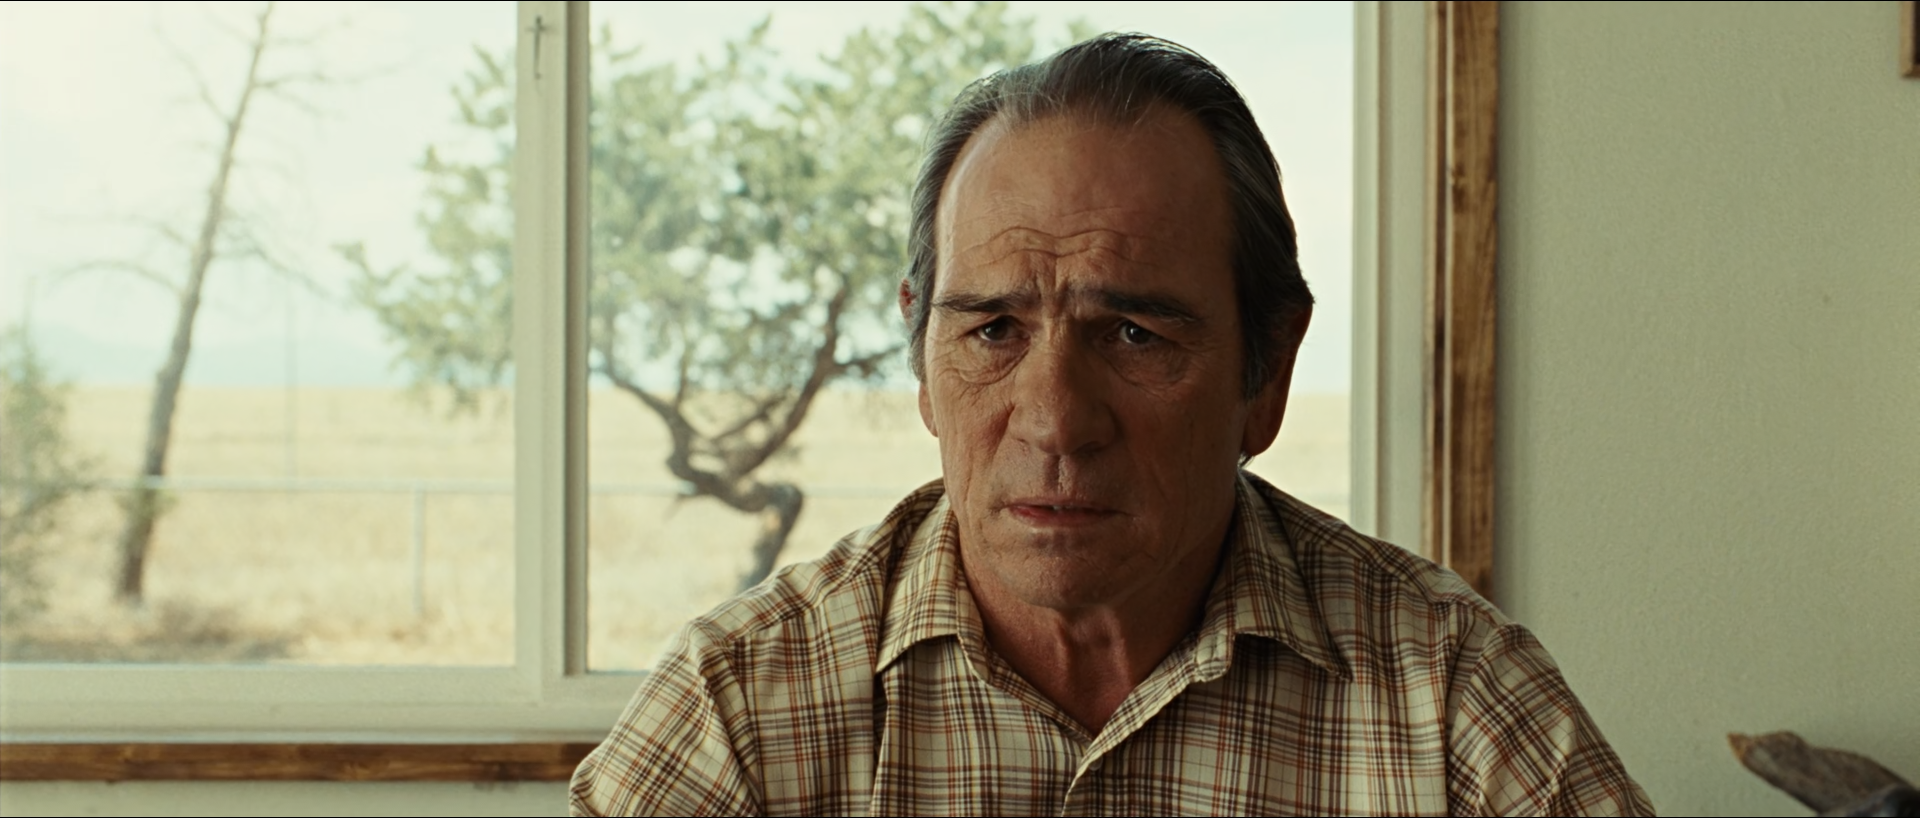
08 · Window study · the last face · shot 1382 · 02:55:54:13

A lined face before a pale field

Sheriff Bell sits at a kitchen table in a brown plaid shirt, looking toward the camera; behind him a large window shows a bright, pale field and a twisted tree, and the cream wall at right catches soft daylight.

Regular-footage feasibility: Conditional Composite/VFX read: low
An older man with grey hair and a lined face in a brown plaid shirt sits facing the camera in a pale room, with a bright window behind him showing a sunlit dry field and a crooked tree.
The window field is near white with a green-yellow cast; the face sits much lower, soft-lit, with the room's cream wall between them.

What is remarkable

This is a high-key frame with a strong split: 42% of the picture in highlights, mostly the window, and a face and shirt in the midtones. The window view is pale yellow-green (the frame's mean a* is negative, about −3) with a tree and fence still readable; the cream wall and window frame provide an intermediate step that keeps the face from floating against the exterior.

The face is soft-lit and lined, its shadow side only moderately darker than its lit side, warmer than the window view. Unlike the side-lit faces of the confrontation, this face is shaped by broad window and room bounce, and the grade must keep its texture rather than add contrast to it.

Where the image comes from

A real window with a daylight exterior, a soft interior key or bounce on the face and a pale set supply the construction. The grade holds the exterior just below clipping with its texture, keeps the face warm relative to the window's green-yellow, and preserves wrinkle detail. It cannot recover a clipped window or add the exterior's texture.

Place the face first, then key and roll the window as its own field. Use the cream wall as a reference for the interior's neutral, and do not cool the face to match the exterior.

Waveform

RGB distribution

Vectorscope

Can regular footage get there?

Conditional

Achievable when the window exterior is recorded below clipping in the same exposure as a properly lit face, typically with ND on the window or strong interior fill. A clipped window cannot be graded back to this view.

Minimum capture conditions

  • Window exterior exposed below clipping with field and tree texture.
  • A soft key or bounce that brings the face within a few stops of the window.
  • A pale interior wall to bridge face and exterior.

Composite and background read

A practical window is the plausible read

Focus falloff, window frame edges and the exterior's haze are coherent. Window exteriors are sometimes replaced or enhanced for exposure control, but no edge or parallax cue here suggests it.

A replaced or enhanced window exterior cannot be ruled out from a still.

Shot-specific Resolve pass

Use the global tree, then make these decisions

N06

Roll the window as its own field

Key the window with a soft luminance qualifier intersected with the frame shape; lower density 0.2–0.4 stop and hold its yellow-green.

Why: The exterior must read as bright day without competing with the face.

Watch: Halos on the window frame and the head edge.

N08

Lift the face, keep its texture

Soft face window with a small lift in the lit side and midtone detail preserved.

Why: The final face is the frame's subject; contrast should come from its lines, not a harder curve.

Watch: Softening wrinkles with glow or noise reduction.

N05

Warm face against a green field

Protect skin hue from the window's green-yellow and from any interior cool balance.

Why: Face and exterior are different light; matching them flattens the room.

Watch: Skin key catching the brown plaid.

N03

High soft shoulder

Rolled shoulder for window and wall so 40% of the frame can sit high without clipping.

Why: The frame's key is high; a hard clip destroys the view.

Watch: The wall at right losing its gradient.

Failure modes to check before approval

  • Window clipping and losing the tree and fence.
  • Face cooled to match the exterior.
  • Halos along the head and window frame.
  • Wrinkle texture softened by glow or noise reduction.

Measurement note. Measurements use the active 1920×818 image only. L* and C* follow the provisional gamma-2.4 interpretation; percentages describe this verified midpoint, not a duration or an object mask. Scene-report figures are medians over reviewed regions of the whole shot and are cited by report and shot.

Reconstruction note. Suggested Resolve values are broad first-pass ranges for correctly normalized log/raw sources. Reconstruct value and colour relationships rather than knob positions, and make separate output trims for the actual delivery.